Saturday, April 1, 2023

Long Term Projects Number 3

 Sarah's Revival

Nothing says "long term" like a Sue Garman pattern.  

You can read previous posts here and here.

If you haven't read previous posts, here is a very short recap.  I started this project in June 2020, and thought 4 blocks per month was an achievable goal.  After finishing 2 or 3 blocks, I realized that 2 blocks per month was far more reasonable (as each block was a total of 7-8 hours) and that was my plan going forward.  Reality was about 1 per month as I'm on month 33 and I'm working on the four center blocks right now.

Partial applique with back basting all in the orange thread.

In Sept of 2020, while I quarantined for two weeks, I got a lot of prep work done.  All the backgrounds were cut, stay stitched around the edges and I drew out each motif for my back basting applique. Nothing says commitment than cutting up several yards of your favorite background fabric. (RJR French Vanilla)


 My reds were all picked out and cut into the sizes I needed and I would baste the reds onto 2 - 6 blocks at a time.  Next up was doing the back basting.  Since this part doesn't require much concentration, (you are just following the stitching lines on the back) it could  be done any time, and I picked it up and set down with no need to get into any rhythm of stitching. 


 Here is what 1/2 way looked like.  16 blocks done and 16 more to go (minus the center 4)

All the blocks were kept on a pant hanger, in order of when the back basting was done.  When I was ready to applique the next block, there was ALWAYS a prepped block ready to go.  This was my "go to" bag of stitching for travel.  2 -3 hours on a plane, 1 -2 hours sitting in an airport, an early morning waiting for a ride, a doctors appointment (always some waiting time). By having things prepped, it was one needle, one bobbin of red thread and little snips.  A perfect purse project.

One thing I do is put up my blocks on a design wall and admire them.  I used to think I was wasting valuable sewing time, as I would put the blocks up, stand back and admire them, snap a photo, then take them down and put them away.  In hind sight, this was very motivating.  Once I started to see how far I had gotten, I would become re-energized on the project.  After crossing over the half way point, the applique got a bit easier, I had all but 4 blocks prepped, and was starting to see an end to the center being completed.

26 blocks were completed by Nov. 2021  


So here we are in April 2023 and 32 blocks are finished and I'm working on the four center blocks.  I took a break from the project (but never packed it away) and now I'm onto the 4 center blocks that are all identical.   By slowing bouncing in and out of this project and having it ORGANIZED, I've managed to keep it moving forward.  I also decided to make the appliqued border.  I did a Study Group through AQSG in Sept 2022 on Quilts with Borders, and knew this one had to have the border included.  It may take several more years to work that out, but it's all in one bag, I've chosen the applique method I'm going to use for the swags, and I've been advised that it's best to practice the appliqued sawtooth edging before diving right in.  

So keep organized and keep stitching, every time you work on a project you are that much closer to finished.

Sharon

Wednesday, October 19, 2022

Long Term Projects Part 2

Each type of project gets a little different path of production. This post will explain how I look at fusible machine applique (FMA). As much as I love hand applique, this style of quilting holds a special place with me. It was the first, stand alone, workshop I took after learning how to quilt. A few weeks after that class, my phone rang and on the other end was someone from that workshop, asking if I wanted to go on a local shop hop with her.  This  someone is now very dear to me and we still quilt together 22+ years later. In fact, we will be retreating together in a few weeks.
Old Voices Jeanna Kimball Pattern

 Once you decide on a pattern the first step is to pull out your light box, pattern, pencils and fusible webbing.  I like Steam a Seam Lite. Trace out EVERY piece needed to create the whole quilt. While doing this step try to to maximize your fusible by keep shapes that use the same fabric close  together. Each block gets labeled and I draw a line separating the pieces for each block. Now you can put away your fusible and light box and get to the next step. 

Pull fabrics for each block and start the fusing process. If your block has cherries, that section of fusible will be cut and fused to a red fabric and set aside. Continue until you have all the pieces of the block fused onto fabric. Take those sections and put in a zip bag. I would continue until I have all the drawings fused onto fabric. Now you have something that can be done in the evenings, while watching tv. For me, this time is not dedicated "quilting" time, but family time. Put a paper bag on the floor and start cutting out all the shapes. Make sure each piece goes back into its own labeled bag.

Now the only thing you have to do is cut your backgrounds and start designing with your ready to go pieces.  Organize your applique pieces on the background and fuse following manufactures directions.

Once you have all your blocks completed, they are ready for the machine applique.  For the quilt shown above, it was a perfect retreat project.  All the blocks were stacked up, I picked one color of thread, and machine stitched EVERY piece on EVERY block before I changed out my thread color.  I see quilters change threads 5 - 6 times for one block, and then move onto the next block.  That method is a huge tine sucker.  After all the embellishment stitching is completed, you are ready to assemble your quilt top.

For the quilt shown above, I decided to make 1/2 square triangles from all the colors used in the applique, as well as other fabrics.  Each time I had a fabric out for fusing, I also cut a couple of squares, drew a line corner to corner and bagged them up.  Any time I had light prints on my cutting table, I cut a few squares for this project and continued to add to my sashing bag.  Don't forget to draw the line before putting them into a bag.  Now I had a "leader/ender" project (Bonnie Hunter system)..  It's amazing how fast these 1/2 squares get sewn together.   Every time I get sewing time, I commit to cutting, pressing and trimming 10 units before I start on my project at the time, and at the end of my sewing time I organize 10 more blocks on my sewing table.  That way I have set myself up for my next time at my sewing machine.  Once my 1/2 sqs were finished, I again, use the "leader/ender" process to sew the blocks into strips of 6.  Also think about Victoria, from VWFQuilts, and her 15 minutes of play.  If that's all the time you have to sew, grab this bag and sew a few pieces, or trim up a few pieces. In no time all your sections will be together, and you are on the home stretch of putting the quilt top together.

While working in this method, a lot of time is saved and you might not get burned out at that thought of cutting, marking, sewing, cutting, pressing, and trimming 372 half sq triangles and then sewing them into strips of six.  The sections organically get put together while you are moving forward on other projects.

These tips will only be helpful if you work on several projects at one time.  I know there are some outliers who start and finish one quilt at a time. Let me know if this has been helpful.  I have a few other 'process posts' rolling around and I'd be happy to share.

Meanwhile, keep stitching,

Sharon
Monday, October 10, 2022

Long Term Projects Part 1

I was chatting with another quilter about how to keep the mojo going on these long term projects, and thought it would be a good thing to blog about. Some quilters literally crank out tops at a rate that could make you dizzy.  Other quilters work on projects that take years to finish.  Both kinds of projects are great, that's the beauty of quilting.  There is something for everyone.   I tend to fall into the "years to finish" category, and yet, I can crank out a top in a hurry when needed.  This wasn't one of them.

Hand pieced Judy Newman Pattern
 

With most quilts that I make, I tend to break down the project by PROCESS.  This pattern has only one block, so the first process was making the templates.  Since I would be reusing each piece, some over 120 times, I knew that freezer paper, even the heavy stock, would not hold up to repeated use.  Once I had templates made, I started picking fabrics for each block.

The second "process" was pulling fabrics for the first few blocks.  Once you do a fabric pull, the next step is to get out your marking pencils, sandpaper board, cutting tools etc.  Start marking out one block and get it on the design wall.  Mark 3 or 4 more, and this will set the tone for your future fabric pulls. 

Keep going until you have all your blocks marked, cut and on the design wall.  Once you decide on your layout, then photograph your top.  Next, photograph each block, create a folder on your phone and move all the pictures there. Tackle one block at a time.  I take the pieces off the wall, layer pieces that get stitched together first and pack it in a zip lock clear bag.  Now you are ready to "grab and go"

Hand piecing is a perfect project for your purse or carry on bag.  You can get little bits of blocks put together without sacrificing any "sewing time".    I use a zip pouch that contains a few zip bags of pieces, needle and thread, small snips and my tiny pin cushion.   We rarely go anywhere without our phones, so having the photos of each block gives me a road map to the layout of fabrics.

At this point, all your fabrics can be put away, and you don't need anything but a zippered pouch to carry this around with you.  Those moments waiting for appointments, watching kids at sports games, going to the grocery store with someone else driving, relaxing with family in the evening are all opportunities to move these blocks forward.  It takes up virtually no space as you only need to have one or two little zip lock bags in your pouch. 

  For everyone things are different, life interruptions happen.  Work, kids, parents, home renovations, broken bones and broken machines.  There are so many external factors that can inhibit traction on projects.  Just know you are not alone.  Your setbacks will be unique to you, but hopefully some of my habits may help you jump start a project or prevent you from putting it in a box on the back of a shelf.

The photo above is now a top, and the next steps to moving it forward are to make a backing, choose a binding and get it made and tagged, and decide on how it will be quilted (beyond the decision to hand quilt it)  I'm leaning to a Baptist Fan so once it's marked, I can baste it and start the hand quilting. But it has to get in line, I have several in that slot already.

Keep stitching,

Sharon

Wednesday, September 21, 2022

Workshop Sketchings

Last month I took the plunge and signed up for Bethanne Nemesh's Fiesta Feathers workshop. As we all know, there hasn't been opportunities for in person workshops and my one effort with an online workshop back in 2020 was a bit of a fail (IMHO) 

Having followed Bethanne on IG for the past while, I'd been seeing her videos of quilting and how she was approaching her viewers. I was optimistic that her class would be good and I signed up, after waffling for several weeks. I'm so glad I did. We have had 2 lessons so far and although they are a lot of review for me, I've gained so many opportunities to clean up some bad habits I'd gotten into over the years. Here are a few sketches of ideas I've done.


 I'd love to feather your quilt top.  If interested, please reach out to me and we can make a plan.

Keep stitching,

Sharon

Sunday, August 28, 2022

NW Washington Fair Quilts

 Here are 12 quilts from the NW Wa fair held in Lynden WA every summer.  The last two are mine and it was great to finally be able to have these two pieces hang for public viewing.  If you haven't entered in your fair, local or state, I strongly encourage you to.  The people walking through the exhibit are constantly blown away by the colors, designs, patterns, and workmanship.  Non quilters enjoy these exhibits as much as the quilters do.

Lots of compliments on this one, viewers love seeing themed appliqued quilts

Best of Show, Wool applique and beautiful piecing.  


A Minick and Simpson pattern that was very well done.  I love the crisp color contrasts 


Snake and Ladders?  Hand quilted with a bigger stitch.  So graphic, this was one of my favorites.


More hand stitching.  Kanta styled dense quilting on this gives it a beautiful tactile look.  Close up it was stellar.

This sampler has been hem stitched all around.  I've just recently heard about this method for finishing smaller samplers.  These vintage cross stitch patterns are so delightful. 


Oh la la.  Look at these mittens and matching hat.  I know the maker and told her, "no need to wrap these at Christmas now that I've seen them"  I can't imagine how knitters keep things so organized


A small but mighty piece.  JB has a knack for taking an ordinary Bow Tie block and making it spectacular. 

Another Minick and Simpson pattern.  This one was shrunk down, darkened up with fabric choices, and beautifully hand stitched with a 12 wt(?) thread.  


Dalias on display.  JB's work is wonderful.  There is a lot of machine quilting on this which really draws the viewer into it.

Lastly, these two are mine.  My Beyond the Cherry Tree  by Sentimental Stitches finally had the chance to hang for public viewing.  It's over size for several shows I wanted to enter, but the fair had a spot on a wall that was perfect for this. 

To counter all the hand work on the BTCT, this one, Old Voices, New Impressions by Jeana Kimball is fused, blanket machine appliqued, and longarm quilted with cross hatching and outlines around all the applique.  

I love both of these pieces.  If you want to see more of my applique or my hand  quilting and you are in a guild, please reach out to me.  I have two great trunk shows, The Machine Quilter who Hand Quilts and  Many Ways to Applique.

Keep stitching,

Sharon

Wednesday, April 20, 2022

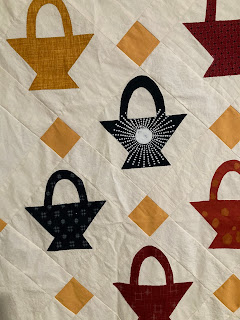
Blue Baskets 2.0

 From the minute I saw this top, I knew it was one that I just had to make.  Like RIGHT NOW, and I'm so glad that I did. 

This was created by Lori DeJarnatt of Humble Quilts and is featured on pg 53 in the June 2022  American Patchwork and Quilting.  I had the pleasure of quilting it for Lori and I couldn't resist tracing the basket for my own personal use (with her permission, of course)  I've kept my version under wraps until the magazine hit the news stands and now I want to share my vision of her pattern.

Blue Baskets 2.0


 Right now mine is only a top. I wanted to use up fabrics I had left over for another couple of projects and these baskets are perfect for that.  The finished block is only 6" and with using a fusible method, your basket fabrics may be able to come from your scrap basket.  

Most of my baskets came from left overs from this project.  They are not all "quilting" fabrics, but I loved them and I love the combo of red/navy/gold.  Not quite Americana, but certainly pieces that I will put out during the year.

Here is a BIG tip.  If you are using the sheets of fusible that come in a zip bag, you can get 3 baskets by splitting out the handle and making it a little longer.  I simply tucked the handle under the top edge of the basket when I fused it to my scrappy muslin squares and no one will notice.  


Some of my favorite fabrics shown here.  I chose to float the blocks and the corner posts along the outside edge and not add the 1/2 baskets.  Honestly, it's because I ran out of time for sewing.  I had a retreat coming up and wanted to keep this under wraps, and knew I was moving my studio immediately following my sew days.

Here is the back view so you can see how I quilted this.  The goal was to keep it simple, clean and traditional.  There is lots of sashing space for dense motifs if that's how you want to quilt yours.  I've decided I'll quilt mine a bit different, but also very traditional and about the same density.  These baskets just need an outline to let the fabrics shine.

So grab the magazine, start prepping your fusible and get busy.  You will not regret making this project. If 50 baskets seems too much, make it smaller.  13 would make a very sweet wall hanging or table topper.  Thank you Lori, for such a lovely pattern.

Keep stitching,

Sharon


Friday, March 25, 2022

Back Basting Applique Basic Tutorial

I love applique.  The techniques I use vary from project to project, but I have a lot of tricks in my applique tool box.  For all the teachers and other quilters who have shared their methods and ideas, I thank you.  Just like there is no one way to quilt a top, there isn't a "right" way to applique.  Back basting is a method I first learned from Jo Morton and from there, I continued to learn more about this technique from other quilters.   One of my favorites is Jeana Kimball.  Go HERE to watch a video of her doing this type of applique.  Follow her on IG @jeanakimball

Here is my motif drawn out on the back side of the fabric.  Remember, if your pattern has an orientation, ie a teapot, you MUST FLIP/REVERSE YOUR IMAGE, just like when you draw out your designs for fusible applique.  A light box is very helpful for this step.

After tracing the pattern to the back of the foundation fabric, I  basted a full piece of the red print to the top, both pieces are Right Sides Up. **This particular block is using only one print** This holds the top fabric in place while I do the basting along my drawn lines from the back of the foundation fabric.

Here is the "back basting".  You are basting right on the drawn lines from the back of the background piece, hence the name.  Make your stitches on the front a bit bigger than on the back.  You will be pulling out these stitches as you do your needle turn applique.


Here you can see the top of my piece.  Those loops of thread and tails are there for me to grab on to when I start stitching.  I will pull the thread away from where I am doing the needle turn, releasing 3-4 basting stitches at a time.  The basting acts like pins, holding everything in place until it is stitched down.


Basted and trimmed Sarah's Revival block, ready for me to start doing the needle turn applique.  My perfect block to grab when heading out on a trip.  No pins, just my needle, a bobbin of thread and my little scissors to cut the threads.  The longer this piece "sits" like this, the easier it will turn under when I start to applique.  The basting will also give you a line on the background to see where your pattern is.

**Some Details**

Using a thicker weight thread to do your basting gives more definition to the final stitching line.  It's a great opportunity to use up some of those old threads that might be in your sewing basket. 


These duckbill scissors help to keep you from cutting your base fabric.  Be very careful when trimming your shapes.  Don't worry about getting 3/8" seam allowance, you can always trim back a few threads of the fabric once you start doing the needle turn.


Fully trimmed piece, all prepped and ready to stitch.

 I have basted down the bottom part of the flowers while doing the applique.  They will be covered with the stem section.  For this block the large center stem is covering the base of all the leaves and it hugs the center  flower bud, so it will be the last piece I back baste, and I won't add it until all the under pieces are appliqued.

Blogger was not my friend while setting up this post, but I hope you have enough info to get started on a project using this method.  And check out Jeana, she's a master at this method.

Keep stitching,

Sharon