Saturday, November 30, 2013

Pillow Talk - Photo Heavy

Zippers should never intimidate you again.  My friend M has given me a few lessons on pillow zippers.  Every time I go to make a pillow, so much time has passed that I need to invite her over to teach me all over again. I had 2 Hallow'een pillows that didn't make the timeline but I vowed to have them done by years end.  After we got the first one done, I knew I had it.  But just in case, I thought I would do a tutorial when I made the second one so I will have it to reference back to.
Here it goes........and of course you can email me if something isn't clear!

Start with a backing that is a few inches larger than your pillow top.
Pillow top has been quilted onto a piece of Warm and Natural

Cut the backing in half where you are going to put your zipper.
Take the top half, and on the cut, fold over 1/4 " then press and hem.

Fold over a generous inch, this is going to be the cover of  your zipper.

Get out the glue to make this part easier.   Put the zipper right side down and line it up to the top of the fold and eyeball the center of your backing.

I use a small amount of glue as it's so much easier than pins.
You are going to work on the bottom of the zipper, and I found it best to open up the zipper a bit to start the stitching.
You can see my stitch line.  After I've sewn part way, I stop with the needle down, lift up the presser foot and then close the zipper.  This makes it easy to finish the sewing line.
You can see I've sewn right to the end of the zipper here

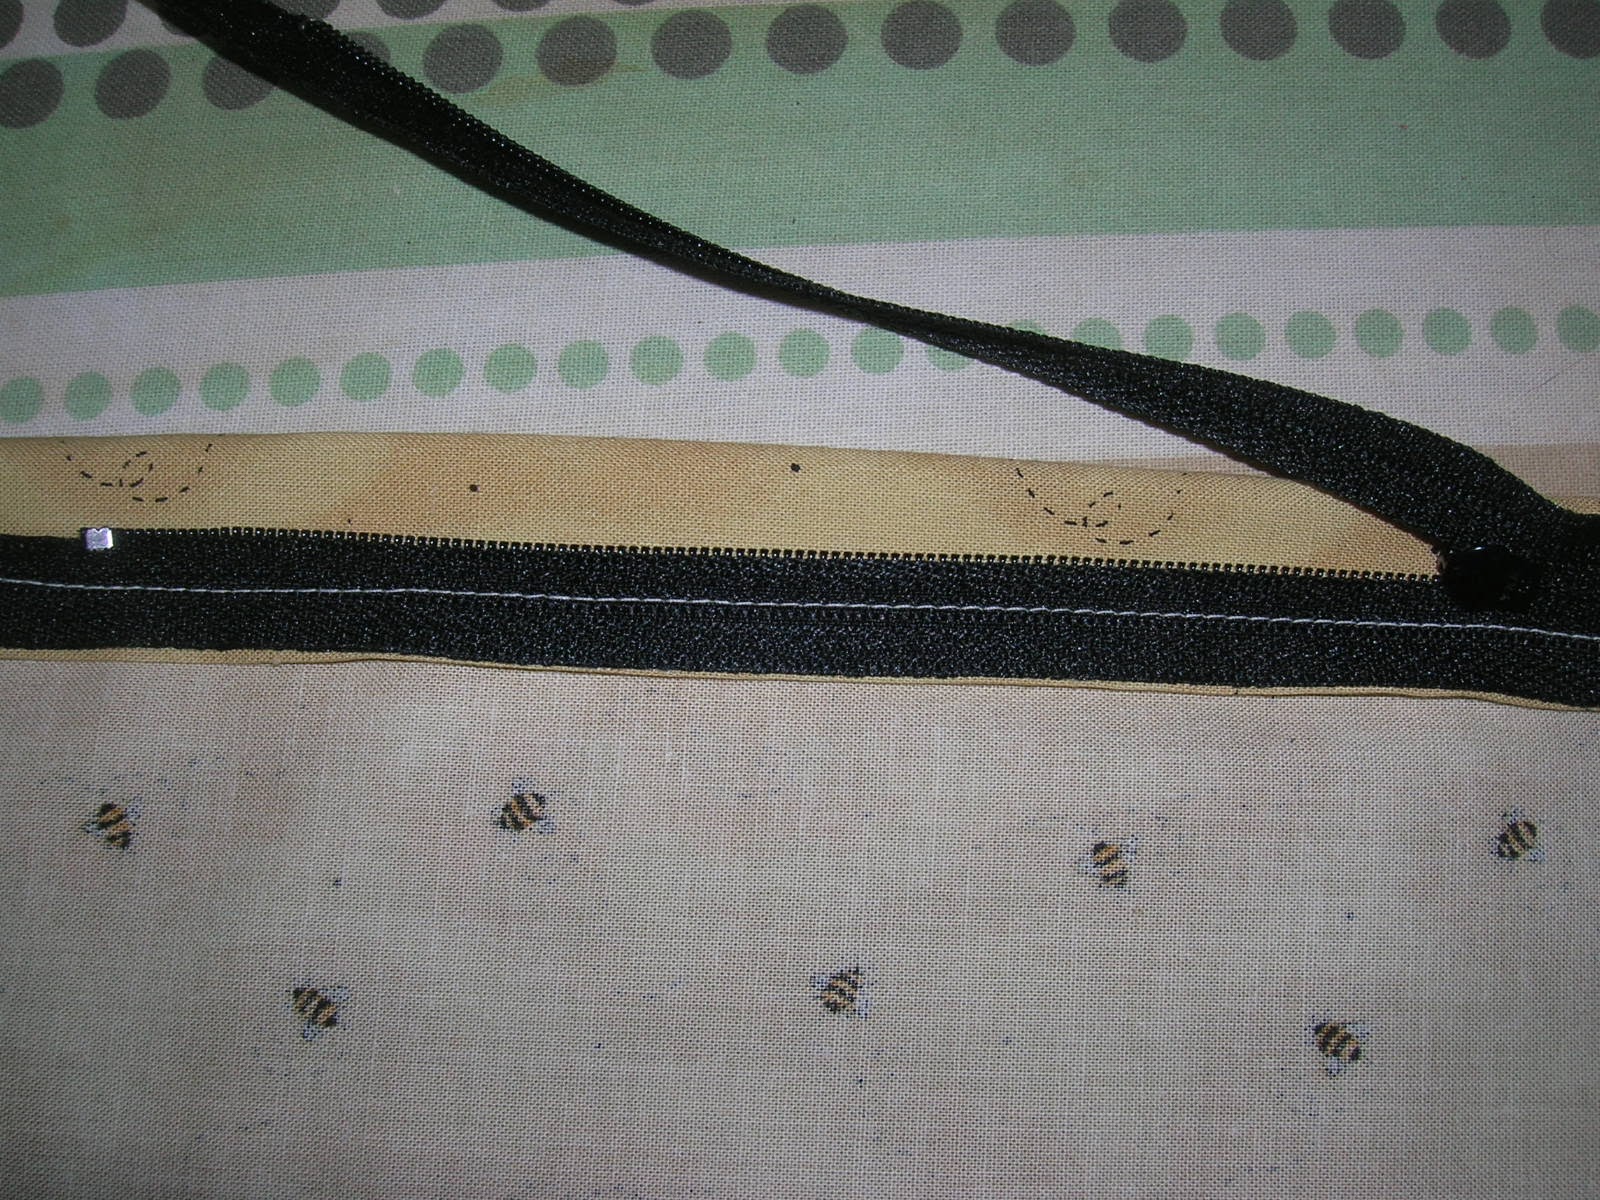
Next you take your bottom half of the pillow back and along the cut edge, turn under about 1/4"  You can see I'm holding the "flap" that I just stitched out of the way so you can see the zipper.


I've lined up the folded edge of the bottom half so it butts right up against the zipper teeth. and have lined up the side edges.

Again, here comes the glue.  It is so helpful with this project.


There is no need to pre stitch this hem, as it gets sewn down when you attach it to the zipper. I do place a couple of pins to keep my edges lined up.


I'm going to start sewing from the far left and I pinned the beginning of the zipper


Here we go with the stitching.  If you are a Pfaff owner, you can appreciate the funky foot.  Geez, it took me forever to figure out how this darn thing worked, I finally has to go online and realized I was putting it on backwards!!!

Again, I start with the zipper open, stitch part way, stop with needle down, lift up the zipper foot and close the zipper.

Stitch right to the end of your fabric


Now you need to back tack the ends of the zipper.


This is done on both ends of the zipper.


Now you have a zipper in the center of your pillow back.  The next part is how I like to finish my pillows

Basic quilting on the top of the pillow, just Warm and Nat.  You can line this, not use batting, whatever your choice is on this part.

Then I put my backing wrong side up, and put my pillow top right side up.  (Wrong sides together)


Then I attach binding to the pillow top side and turn it, hand stitch it to the back,  just like a quilt.


And there you have it, an easy way to put a zipper in a pillow case. Now I'll be ready for Hallow'een 2014!!

I hope you all had a blessed Thanksgiving with family, laughter, and leftovers.

Last night we got one room decked out for Christmas at my sweetie's house, lights are up, radio was playing carols and we sat and enjoyed the night with a log on the fire until 1 a.m. last night. 
Life is GOOD

Sharon

Tuesday, November 26, 2013

100 Bottles of Beer on the Wall

I can't get this tune out of my head. I've counted and recounted these star blocks so many times. Finally, I've got 81 stars finished!
These blocks will become this quilt top.
I've got one row together and I'm loving how it looks. It was a great color choice for my first solid 2 color quilt.
81 bottles of beer on the wall...... :-)

Sharon

Monday, November 11, 2013

BTCT Update

I've been poking away at this over the summer and now it's the perfect time to get back at this quilt. Today is my first day of Unemployment Enjoyment. I have my resume updated, have started looking for work, and will stay positive that a good job will become available that matches up with my skill set. In the meantime..........
Let's QUILT!

I've assessed this piece and I have 15 of the 25 blocks completely outlined in the white thread. The other 10 are in some state of finish, some just need a few more things outlined and others have not been touched. Nothing has been done on the border outlines. I'm focused on the outlining, this is where I start when I pick this up and then I like to end with a little of the x hatching.

One stitch at a time, that's how this will become a quilt!
Sharon

Sunday, November 10, 2013

Hello?? Hello?!!?

Hey, over here, remember me?
Wow, it's November and SO much has happened since my last post and I didn't see any of it coming. Life has a way of making you roll and here is the very short version.
That new job I started in June has come to an end, due to my decisions. (all good) I'm head over heals in love with my best friend, someone I've known for 6 years. We got together the end of Sept, hence my lack of quilting and blogging. Finally, my dad had successful colon cancer surgery and is now settled in AZ for the winter.
All that means LIFE IS GOOD!
I've done a few customer quilts and am excited to get back to some of my projects. Quilting has been on hold while I have settled into my new routine.

The one thing I've continued to work on has been my Beyond the Cherry Tree. Wow, that's a lot of hand quilting that I decided to do on this baby, but I'm loving the look of it.

I've started my 6 month workshop at Fabric Etc in Bellingham, WA; two classes completed and so far no one has jumped off the edge, so I must be doing ok with my students. I love sharing the tips and tricks I've gained over the years. It can be so frustrating if you don't know some tips and short cuts, and that's the focus of my workshop.

Fall is here,it's the perfect time to snuggle under a quilt with a cup of tea. I've got an injured cat snuggled up to me and we are happy!

Sharon