




Showing posts with label Hand Work. Show all posts

Sunday, December 26, 2021

Journey to Camelot

This pattern was featured in Quiltmania 111 - 114 in 2016.  Yes, I'm late to the party, but since there is no schedule on starting a new quilt, I'm OK with this.  The pattern caught my eye after I saw it finished. My friend gave me a private bed turning at her home full of quilts and antiques, and I knew I had to make this pattern.

This is block A, stitched but not pressed.  It is also missing the corners that consist of 2 triangles on each side.  I've been cutting them as I go along and will add them once my blocks are on the design wall. Petra's PinDot in Lighthouse was chosen for the background so I ordered a bolt from Reproduction Fabrics and HERE is the page with all the available colors.

Having a cell phone to snap pictures is the  best way to keep things organized.  I have created a folder in my phone and now I have a color road map when I start stitching these blocks. This block as 60(?) pieces that needed to be picked, traced, and cut out....whew!


The other advantage of having a phone handy is that you can revisit your choices before they are stitched together. (sort of)  I did stitch the little triangle to my fussy cut Margo Krager gorgeous ombre floral and have since replaced it with a different fabric.  She also has solids in ombre and they are beautiful.  I love the Betsy Chutchian print from Elinore's Endeavor collection for the background pieces.  With a quick search, I could only find the brown or pink colorway, but I'm sure if you searched a bit more the blue might still be available.  This whole line is gorgeous.
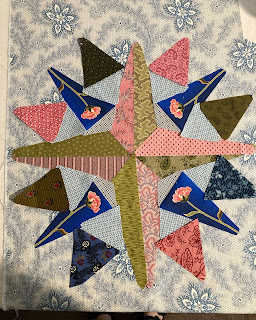
 

Being scrappy, it takes a lot of time to pull, audition, press, draw, cut, layout, refold and put back each piece of fabric. I've spent over an hour just prepping each block, but this is the time consuming part.


I couldn't resist fussy cutting this block with this paisley.  Having all the photos in one folder allows me to see how the blocks will play together without having to transfer all the pieces of each block to the design wall.  This one will get along quite nicely with all the other blocks.  Oh, how I love a good paisley!

This center fabric has been waiting in the wings for it's place in this quilt, and the center of this block is exactly the right spot! Yellow, navy, pink paisley! Small pieces of these types of fabrics make big impacts.


The fabrics in both rings have also been pulled and set aside, waiting for the right block.  I'm super excited to start the stitching.

There is a border of 1/2 square triangles and each block has 2 triangles to complete the square. I've been cutting these as I create each block.  Great tip from my friend.  Since this pattern was published as a 4 part series, these are some details that are good to know before you put all those fabrics away.


Along with my photo of each block, I have enclosed a line drawing road map in each block that is bagged up for easy stitching.


Yes, this is a messy project.  Believe it or not, I've cleaned up this area several times and it continues to look like a bomb went off.  Oh but it's a glorious mess, one that will result in a beautiful quilt.


I hope this post gives you a peek behind the curtain, so when you start to see my finished blocks posted on my IG #grassrootsquilting you won't be thinking "oh my, look how fast she works" These types of projects have a lot of "behind the scenes" work. The slogging through parts, the process parts. The fun part is having pieces of fabric ready to stitch together in the evenings, the early mornings when you are the first one up, the few minutes waiting in your car for your appointment time. This is how these glorious quilts become a reality. 

 From my messy to studio to your home, I am wishing everyone good health, time with family and friends, getting fresh air and activity, and, of course the very best of the Christmas season. Keep stitching, Sharon

Wednesday, December 22, 2021

Playing with Hexagons

 This first pattern is from Brigette Giblin and you can purchase it as a download HERE.  I would put it in the catagory of Advanced Beginner.  Her pattern writing could have been a bit better, but if you take it slow, pin and double check before sewing, it will come out lovely. 

I've also had this Giraffe print from Christopher Wilson-Tate that has been pulled out and put away many times in the past few months.  Too many hand projects on the go at one time results in some just getting second fiddle to my stitch time. 

None of these blocks are set in stone, layout wise, but the gist will be motifs surrounded by a variety of hexagons. 


This little container is now busting with hexi's, as this is a great "take along" project and building up the design tools is simply a matter of working in production mode. 

The fun part is when the designing begins.  Nope, when using the giraffe as a center, only one round of hexi's will work!


Much better.  I have also switched gears on a fabric that will be used to join on the hexi medallions.  At least today I have a "final answer"  Who knows what that answer will be in 2022 when I get back to this.

In the meantime, I will be spending Christmas at our "new to us" vacation home. No, I'm not retired yet, we have rented it out for Jan - March, but this will be our last trip to finalize all the little details for our guests.
I see a "Turqouise Door" quilt in my future.

Merry Christmas and I hope you find a few minutes to stitch during this busy time of year. Keep Stitching, Sharon

Saturday, August 19, 2017

A Journey to the Beginning

I posted about this project back in July of 2016  You can read about it here.  


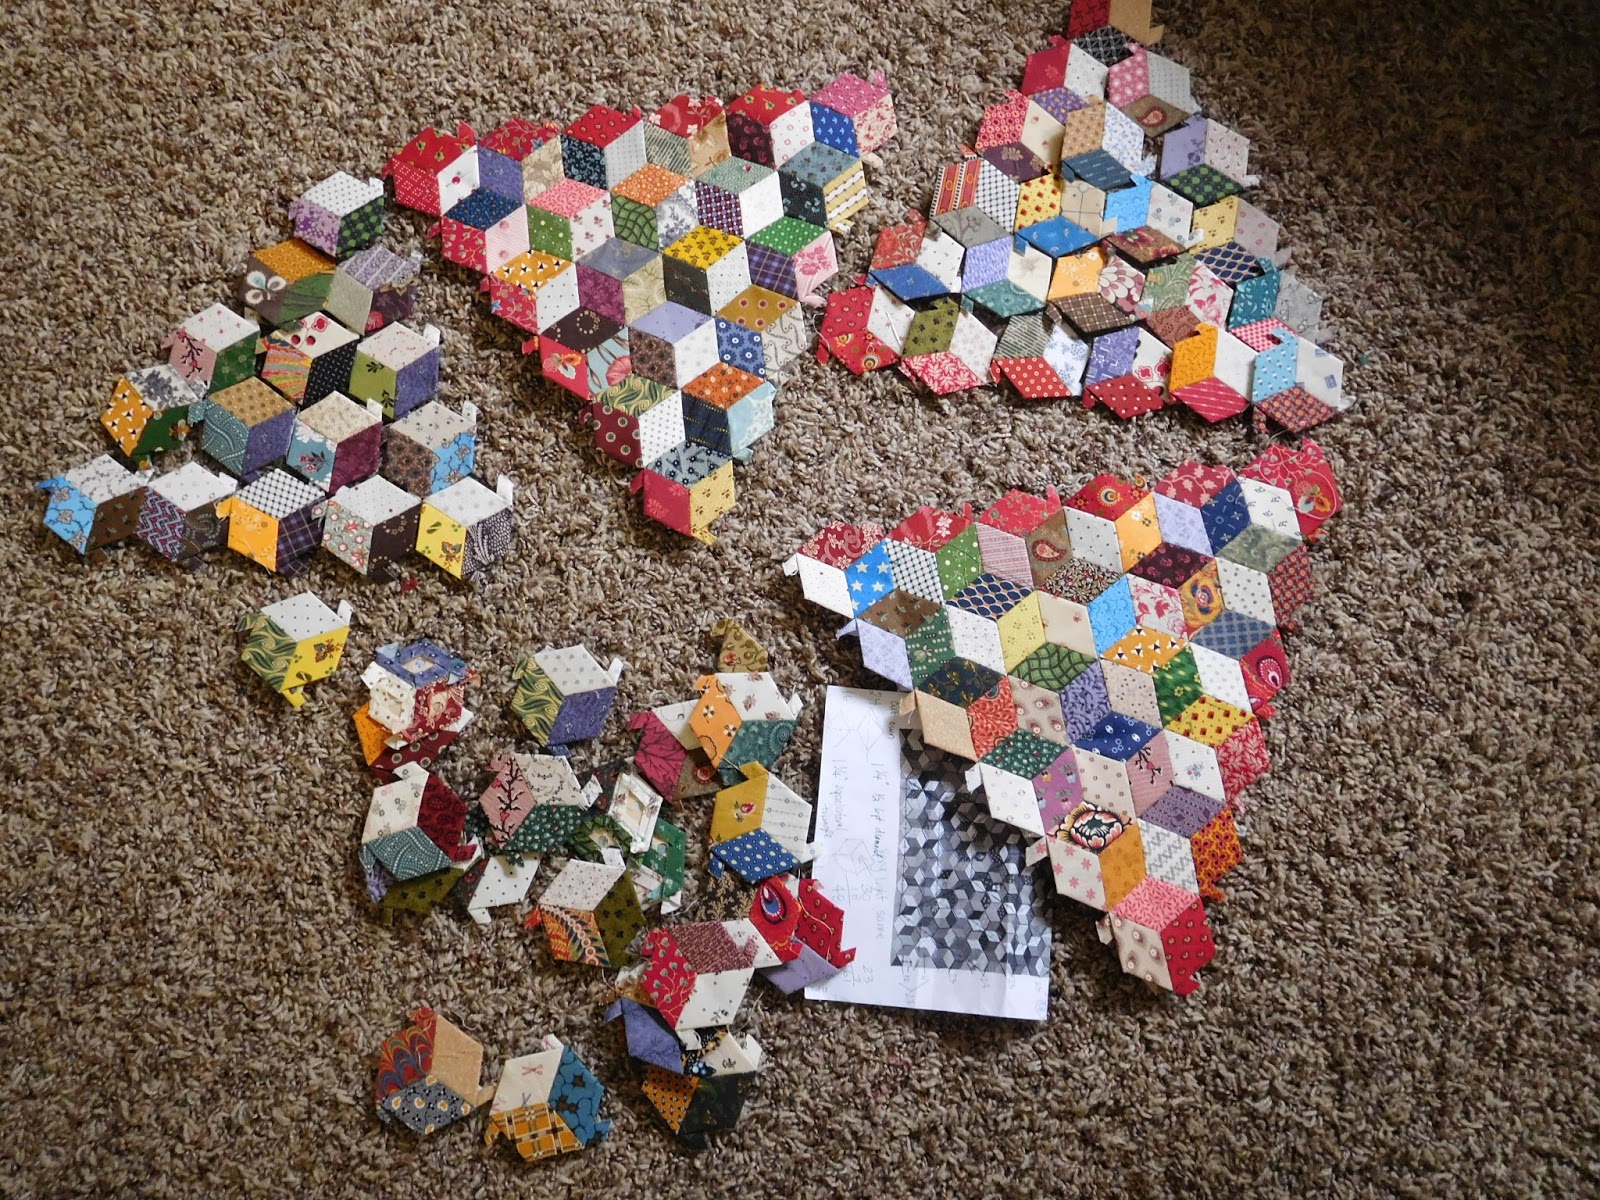
Each section of this uses 63 diamonds and there are 6 sections.  You can see a piece of the black and white that was my inspiration and I was planning on having this as a project to keep me busy while my guy recovered from his shoulder surgery July 2016.  What I didn't plan on was having surgery to put my left wrist back together after taking a tumble 2 weeks after his surgery.

I pondered how to make each section and as you can see, I wanted the red to radiate from the center star.  The vintage piece was quite muddy in it's value placement, and I tried to "brighten" up the lights a bit, but I didn't want it to look too "perfect"


So this has been a long time coming, I started the process July 2016 and here we are, August 2017 and I now have the beginning of a medallion quilt.  It's a bit hard to tell, but the background is a navy blue with a little design on it.  I've removed all the paper with the exception of the outside edge, pressed and Best Pressed to get it as flat as possible, and have heavily basted it down.  I will hand applique the edge and keep the basting in until the whole piece is finished.  I don't want the weight of the paper piecing to sag from the background while I continue to add rounds of blocks to this center.


And since I had stacks of diamond papers left over, I started making stars.  100 of them.


Now I'm adding the background and will stitch this together in sections.  Right now I'm still working on backgrounds. 
I love having these take along projects in the mix of things.  It keeps my hands busy when watching tv, waiting on an appointment, or taking a break from the longarm.  I'm volunteering at the NW Washington Fair tonight, so this box will come along with me.  Fair pictures coming next week.

Enjoy the weekend, if you are in the path of the eclipse, embrace the crazy that will be coming to a town near you!  And as always,

Keep stitching,
Sharon

Friday, February 10, 2017

Exhibit continued.......

Here are a few more pictures of pieces from my current exhibition at the Pacific Northwest Quilt and Fiber Museum.  And on a side note, they are holding their annual FUNdraiser Feb 25, which was formerly knows as Stashfest. 

This piece was from a workshop I taught on cutting and sewing wedges.  We did this the simple way, stacking fabrics and then moving pieces to the bottom of each pile to get a 'random' wedge block.  When I started putting this together, I wanted to eliminate the printed wedges, I just didn't like them in this piece.  After leaving it up on the design wall, I found that by adding in more of this print, I liked it more, and I really liked the star effect.  This was hand quilted with Perl cotton and has such a lovely hand to it.  I faced this piece, as I did on several others in the show. 


A few years ago I took a three day workshop with Gwen Marston and the second day was Small Studies.  I didn't read up on this very much, in fact, I did no homework at all.  I ended up working on a different piece in this class.  The third day was an open sew day, and I was blown away by the other students who continued working on their small study pieces.
#1.  I was working from a box of left overs from a Lone Star that I had gifted out.  Too much print? Maybe.  Let's keep trying.


Last year I jumped at the opportunity to take a Gwen led Small Studies three day workshop in Port Gamble, WA I felt the three days would give me enough time to muddle through some ideas and then really get to work.    Making the inserts and the super skinny piecing was a good exercise.  I really enjoyed this process.  The binding on this piece is edge to edge, no mitered corners. 
This was piece #2.  Less prints and some added color.


This was the third piece that was created in this workshop.  My intent was to build around this and make this the focal point of a medallion piece.  After hearing many comments on how it looked just like Puget Sound, the water, mountains, sky, I decided to keep it 'as is'.  This piece is very small 7"x7". No, it doesn't wing out in the corners, I'm just not the best photographer.   These pieces have also been hand quilted and I used a single binding.


My first "Gwen" inspired piece.  Liberated Log Cabins.  This started my whole journey into this world of liberated, free spirited, add as you go concept of piecing.  It really took a lot for me to not worry about a star point cut off, a strip cut on an angle, or a piece of fabric being pieced together to make it long enough or big enough.  Hand quilted.


When you try something new, you just never know what it will lead to. Lucky for me, this has led me down a path that is filled with color and joy and a whole new outlook on piecing and quilting. It has also satisfied my need for hand quilting and Gwen has given me permission to do SO much with my quilting. I will forever be grateful to this generous, funny, and amazing woman.

Keep stitching,
Sharon

Sunday, February 5, 2017

La Conner Quilt Museum Exhibit

2017 has started off with a bang for me and my quilting.  I have been so thrilled to have a collection of my work hanging at the La Conner Quilt and Textile Museum, now known as The Pacific Northwest Quilt and Fiber Arts Museum. 

This is one quilt I would grab if my house was on fire.  It was started on Lopez Island in a 4 day Gwen Marston workshop, but it took quite some time to complete.  I'll be doing another post with the details, but for now, this is a Show and Tell.  I've had this piece under wraps for over a year, and to have it be shown at La Conner for the first time, well, that made it worth it for me. Hand quilted.


String Theory has certainly gotten some legs.  It's the cover quilt for April APQ and it's also the quilt being used for their 2017 Quilt Along.  Have you seen their posts yet?  If not, they are doing video posts every week.  Court House Steps is the block and they have sketch sheets you can download and try out color options with your pencil crayons. Hand quilted


This one was finished at the Gwen workshop on Lopez Island back in 2013.  It was made from string patches for the star center, points, and the outside triangles.


The diamond round was created using left over 1/2 square triangles from a Bonnie Hunter mystery quilt called Carolina Christmas.  I got that top all together January 2017.  I hand quilted this with straight lines in the string sections and in the red I quilted feathered motifs that I drew to fit each space.  Double half wreaths were done in the corner triangles and the section between the star points have a curling feather filling the section.


Again another piece that came out of a Gwen workshop.  This one took several years to complete.  I hand quilted a different motif in each solid column and stitched a 1/4" in from the seam allowances in the triangle shapes.


Tonya Ricucci was the reason this piece was created.  She threw out a challenge and I call this my recovery quilt.  I never liked the word 'survivor' when talking about people with breast cancer and for me, the word 'thrive' seemed so much more appropriate.  Hand quilted with feathers in the black columns.

 
Who says Civil War prints are drab?  Using a variety of  black solids, and being selective on which string went next, I achieved a bright Lightning zigzag piece.  This one finished at approx.. 42 x 48 but I think this would have made a fabulous bed sized quilt.   Machine quilted.


Main entrance of museum.

Wall view


Another view. 


I hope some of you have had the opportunity to visit and support this NW Textile Museum. Gwen Marston's exhibit runs until the end of March, and my body of work comes down Feb 27. The museum is closed Mon and Tues, so check their website for hours if you are planning a visit.

To be cont......
Keep stitching
Sharon

Wednesday, March 30, 2016

Why I Buy Magazines

I will admit that I have cancelled all my magazine subscriptions. What this doesn't mean is that I don't buy any magazines. I do, and probably too many, but that's another story. This magazine, Primitive Quilts,  was purchased in 2013 and here it is, late March of 2016 and I'm working on the project that piqued my interest almost 3 years ago.


After flipping through the pages of this issue, I knew I had to make this wall hanging. I just didn't know when that would happen. Since I love doing back basting, this was a perfect piece to take on vacation. I just didn't think it would go on two trips.


This is also the first time I've worked with wool. I continue to stay away from all the 'new' things that come my way in regards to quilting. I've got a bit of an addictive personality and if I started working with wool, then I'd need all those threads and with that comes all the new needles, books, workshops....... well, some of you know what slippery slope I've tried to avoid.

Grunge is such a fabulous group of fabrics.  I have used many of their colors and they just lend a really good look to the finished piece.  The designer, Laurie Simpson, of Minick and Simpson used the grey grunge and I loved the look so I copied it.  I did needle turn and used regular cottons for the candy canes. 
Since my collection of wool contained zero pieces, seriously, I had to shop for each color.  I was originally going to use green cottons, but after putting piece after piece onto the layout, there was just something lovely about the wool.  I went with 4 different greens, and since I'm an ex  X stitcher, I have boxes of DMC floss to pick from.


The wool was fused down with a very light product and then I did the blind hem stitch around each leaf.  It was tedious at first, and not what I thought was a good look.  So I did a little section of whip stitching and thought, "yes, that's faster and easier" and went back to finishing that leaf with the blanket stitch.  I started the next leaf with the whip stitch, and quickly went back to the blanket stitch.  It's true, the more you do the better your stitches look, and the wool definitely looked better with the blanket stitch.


Here is everything stitched down, the last bit is the red berries.  25 are on the pattern along with a stem stitch for the berry branches.  I have everything with me to make this a 'finish' with the exception of scissors good enough to cut the circles out with a nice crisp edge. I doubt this will see another vacation, as it's just a few berries.


I've loved this piece since I first saw it, and now, three years later, I'll be able to hang it up at Christmas.  In fact, it's such a good piece there might be a second one at some point, as I think this would make a lovely gift. 

Keep your eyes open for the newest American Patchwork and Quilting June issue, coming to your mailbox or newsstand very soon.  If you don't subscribe, I hope you will purchase this issue as it's packed with great color ideas.  I'm excited to share that one of the reasons my blog has been a bit quiet this past year will be presented to everyone in this next issue.   It's got a wow factor to it, and it was very fun to make. 

Aloha and keep stitching, (yes, I get to say Aloha for one more day)
Sharon

Tuesday, January 19, 2016

Hand Quilting BTCT

The past few months of hand quilting have been on projects that I 'had' to get done, and now it's time to pull out my Beyond The Cherry Tree (BTCT).  I saw Lori over at Humble Quilts got another block finished on hers, so this was the nudge I needed to keep mine moving towards finished.

This is all I need to work on this quilt, well, this and time; the elusive element for so many of us.  I use a Roxanne Thimble, the little blue rubber thimble for my pointer finger to help eliminate the stress on my wrist when pulling the needle through, some scissors and the lint brush.  There is always fluff or cat hair or threads that need to be removed.

 I like to load up my spool of thread with a group of needles.  I do this for a few reasons.  The biggest reason it that I can keep track of my needles.  I would hate to loose one on the carpet and then find it with my foot.  The other reason is that it helps me keep my rhythm when stitching. Finish one thread, and just pull off another one.  No need to stop and thread a needle.  I always make sure I end my sessions with the spool loaded up, makes for a fast start the next time I sit down to stitch and I count my needles.


Speaking of spools, my 'go to' hand quilting thread is YLI. It comes on wooden spools and the manufacturer still hasn't realized we need a place to dock or lock our thread.  No worries, a Sharpie and a sharp pocket knife will do the trick.  I just put a little notch in the edge of the spool, and mark it with a dot of Sharpie.  This makes it easy to find the notch when locking the thread.


Here's a picture of my quilt.  Clearly, I have not stayed on task with the quilting as the top was finished in 2012.  My original goal was June of 2015, then it moved to end of 2015 and now I'm thinking end of 2016 is a possibility.  All the blocks have been outlined, and about 2/3 of the border has been outlined.

The 9 center blocks have all the cross hatching completed, but the quilting in the appliqued pieces will wait to the end.  Changing colors will be the last part of the quilting. 


 However, most of the outside round of blocks, 18 in total,  look like this.  Random lines of cross hatching have been stitched, but most blocks are a few hours away from each being finished.  I got a bit done on the weekend.  It's the perfect break from my longarm machine.  Just getting this quilt out and back on the couch is enough to keep me motivated. 


This is definitely my 'best quilt' to date, and I hope I can keep focused on it in 2016 and find those few minutes here and there to keep rocking the needle on this treasure. 

Keep stitching,
Sharon