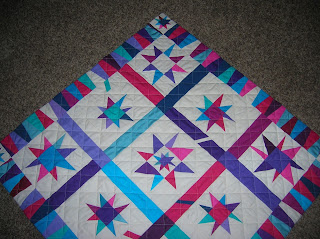
It's great to look back at quilts of days gone by. I recently took some time to refold and reorganize my stack of quilts that reside in my spare room. After looking at a few of them, I decided to snap a few pictures of this one and blog about it.
This is a Blooming' 9 Patch and it came to fruition after my first visit to Sisters Outdoor Quilt Show. I went with a non quilter and after we were on quilt overload, we headed out of town to find our car parked way down the road into Sisters. I stopped to take a final glace at the town, and saw a Blooming 9 patch done up in blues. I was drawn to it like a magnet.
After pondering how this was put together, another viewer pointed out the corner and showed me how it was pieced. I was captivated by this organized chaos. We continued to our car, and headed back to the I-5 via Salem. That required a stop at Greenbaums. The doors were being locked as the last few customers left and I was 1/2 way down the block when my gf mentioned she saw the book that this blue quilt was in. I hurried back, knocked on the door and made my final purchase of the day.
I love this quilt, although I don't decorate with pink and am not really drawn to this color. Now that it's been many years, I looked at this with different eyes last week. I love how I made it go from light to dark and back to medium values, that was not planned. Here's where I would change it up, I used a gingham check after the center toile, and it lacks the movement of the rest of the fabrics. That's truly the only change I would make after all these years.
It was interesting to look at this in a new light. We evolve and our tastes change, but to still love something after moving to a whole new genre of quilting and fabrics is surprising and it makes me smile!
Keep stitching,
Sharon
#grassrootsquilting on Instagram
Friday, November 6, 2015
Monday, November 2, 2015
Just Face It!
It was time to put one of my own designs onto the longarm and I wanted to cross hatch the whole piece. Not a problem except the blocks were 20" and I would have WAY to many stops and starts in the middle of open spaces. After some discussion with my gal pal about loading the quilt 'on point' and then doing the stitching straight across I decided to do a test run on a smaller piece.
I started by lining up the center of the quilt top from left to right to make sure the center row of stitching would go directly across the top, then I stitched the rows up towards the top point. After that, I rolled to the center and stitched the bottom half.
The one discovery was that I should have used a full piece of batting instead of putting the batting on point like the quilt. When I rolled the piece, it was funky. Lesson #1 learned.
After turning the quilt, I had to line up the piece so I had an exact straight line again, left to right. Lesson #2 learned. This seemed easy in theory, however there was a bit of fussing involved.
Since this was a test piece, I figured I'd keep on testing and for the first time, I faced one of my pieces. I have another piece waiting in the wings that a binding would not do it justice, so here is my first attempt at facing a quilted piece.
Lesson #3 was clipping and grading the seams in the corners to get a good turn.
It pays to have a small test piece when you want to try out new techniques. After all this, my original piece did not get cross hatched, nor did it get faced. But this piece got finished, almost by default and I call that a win! One more finish from the sewing room. Yeah for me!
Keep on stitching,
Sharon
Subscribe to:
Comments (Atom)


