Think American Flag, true red, white on whites, and navy blue. Use your best fabrics, and the white on whites can be scrappy and mixed up. So can the blues and reds. This is meant to be a fun, fast, and easy block!
You have to make 4 flying geese (FG) blocks for this star and here is a step by step photo lesson to make 4 in the Elanor Burns method.
Remember, the LARGER block will be your STAR POINTS.
Cut a 6" block of your star point fabric and layer, RST, your white on white background square that has been cut 4 1/2" To use a quick method to center the white block, lay down your ruler at the 3/4" mark and line up your white block to the ruler. Draw a line corner to corner and stitch 1/4" on either side.
Cut RIGHT on the marked line.
Press to the dark side and you will have two of these blocks
:Layer the blocks, RST, matching up the outside edges.
The center seams will NOT match up and that is perfect.
Draw a line, corner to corner and stitch 1/4" on either side of this line.
Again, you will cut right on the line.
Make a snip in the center of the seam and don't worry about going into the stitching line.
This snip allows your block to lay flat when you press to the dark. The center will twist where you put that snip.
You should now have 2 blocks that look like this. Right and wrong side of each. Yup, that's my coffee cup photo bombing this shot!.
Now you need to cut out your two 2" x 3 1/2" FG from each of these blocks and you do NOT need a special ruler. Just grab your 6" x 12" ruler and follow along. Look at the pencil point for reference.
Using the 45 degree line as reference, lay your ruler to match up this grid line with the edge of the FG, making sure you have a 1/4" extra at the point of the FG for the seam allowance. Remember, 2" x 3 /12" will be our measurement.
Once you have your ruler lined up with the 45 degree line, and the 1/4" extra at the point, make sure you have some overhang so you can trim this to 2"
Take the first cut to split your FG from the patchwork
Flip the block around and then using the cut edge, make your second trim to 2"
Easy, right?
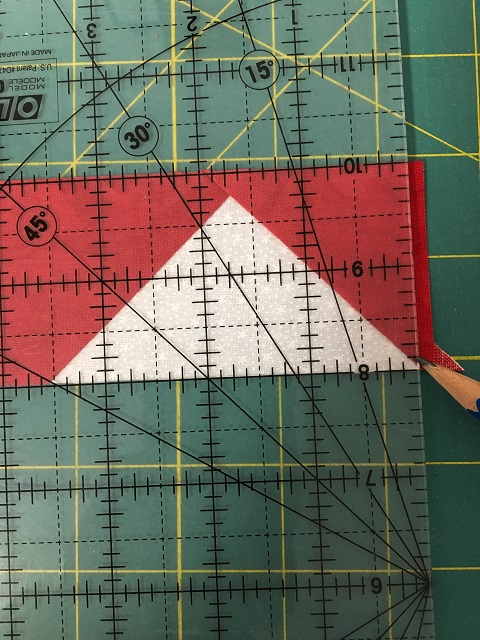
Now you have to make the FG 3 1/2" wide and this is also super easy. Look at the pencil point at the bottom right of the picture below. It is lined up right at the edge of the white/red patchwork and the ruler has been lined up along the top and bottom to make sure you have a straight cut.
At the same time, you can see below, that the left side also lines up at the 3 1/2" mark, and Bingo, that is what we want.
Trim the right side, flip the block and trim the left side to give you a perfect 2" x 3 1/2" FG block
You will end up with FOUR.
Your center block is cut 3 1/2" and your four corner blocks are cut 2"
Sew together just like a 9 patch, because that's exactly what we have here. Below is a two toned star,
Mix it up, I've shown several options. Here the center is white and notice my white on whites are all scrappy.
A solid red star, you can't go wrong with this one!
Here I put in a liberated mini star for the center block. Just for fun.....
They will all finish at 6" when the quilt is built, so have fun.
Any questions, just send me a message in the comment section and I'll get back to you asap.
Happy Stitching,
Sharon


5 comments:
One of my favorite blocks and you make it look so simple! Nice work!
Thank you for the tutorial...what a fun quilt!
Thank you so much. This is a new-to-me method and I am going to give it a try since I always seem to find it hard to get those star points perfect.
Great tutorial, and the liberated mini star in the center is my very favorite thing!
this is one of my favorites too - great tutorial
Post a Comment