Warning - Photo heavy post.
Here is a step by step photo tutorial for making the pieced star block. There is time involved in the pinning process at certain stages, but the results are worth taking a few extra minutes at these stages.
After cutting all your pieces, lay out the star points on top of the background wedges. This will keep you from stitching the star point to the wrong side of the wedge. Trust me, I learned the hard way!
When you made your templates, mark the dots, these will line up and you will stitch right off the edge. Sew all the star points to the wedge section and press towards the star point.
Sew the sections together and your stitching will cross over the first seam. This is how it goes together and it will lay flat when finished.
Press again towards the star point and this is what the outside will look like. The 1/4" is there for setting this into the background.
Take the background sections and finger press it in half. This will give you a crease to line up to the pieced star section.
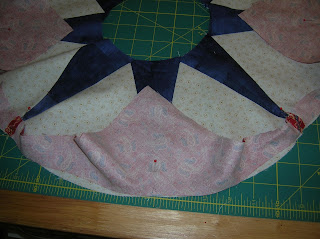
Here is where you need your pins. Using the best quality sharp thin pins, (I like IBC silk pins) start by pinning to the star points. You can see how the seams line up to the points and the crease will line up to the point in the center.
Now start filling in the sections by pinning in the middle of each section.........
and continue to pin in the middle of each section .......
And keep pinning..........
And pinning.......
Until it looks like this. Yes, seriously, using all these pins will ensure an excellent result.
Now slowly start stitching the curved seam you have just pinned.
And you will end up with this. Press to the outside.
Now it's time to inset the center circle. You could take the quick way and applique the center. Or you could insert it by using, yes, a lot of pins.
Again, fold the center to get creases to line up with piecing, and start placing pins.
Pin each section.....
And don't worry about using too many pins. Yes, this really is how I do this piecing.
S-L-O-W-L-Y stitch around this seam ......
Target the dots you have a the seam sections.
And press to the center.
There you have it. A beautiful 20 1/2" unfinished star block.
Any questions, just ask.
Sharon


7 comments:
Thank you for the tutorial! I've pinned this for future reference.
Ha! You make it look so easy!
Thanks for the tutorial. It is stunning!
Thanks so much for the tutorial Sharon...perhaps I need to run out for more pins..
I look forward to trying your method..Thanks ever so much!
Thank you for sharing these tips! Makes giving it a try seem less intimidating1 :-)
Post a Comment