Wednesday, May 2, 2018

Traveling EPP Stars

My EPP (english paper piecing) project had been completed.  Sleeve and all!  I thought I'd share the details here.   Maybe I will inspire someone to pull out an old project they pushed to the side, or take on a brand new piece. 
I'm often asked "how do you get so much done?" and that always seems to catch me off guard.  I guess when quilting is your job, and I follow along so many fantastic designers, piecers, appliquers, and longarm quilters, I can sometimes feel like I never get anything done.  That is why there is a statement that says, "Comparison is the Thief of JOY"


But enough of that.  Here are some of my tricks and tips on getting things finished.  Make sure you always have those hand work projects ready to go at a moments notice.  This piece traveled from WA to AZ to HI to NY to ON Canada and back to WA.  It also when to doctors appointments, the Friday night Street Legal Drags (yup, my guy is a car guy), and trips into town 20 minutes away.  I think you get my point.  It's very portable and easy to poke away at. The whole piece is hand stitched, from the basting to the piecing.


Here are my pieces in a hotel in downtown Buffalo, NY


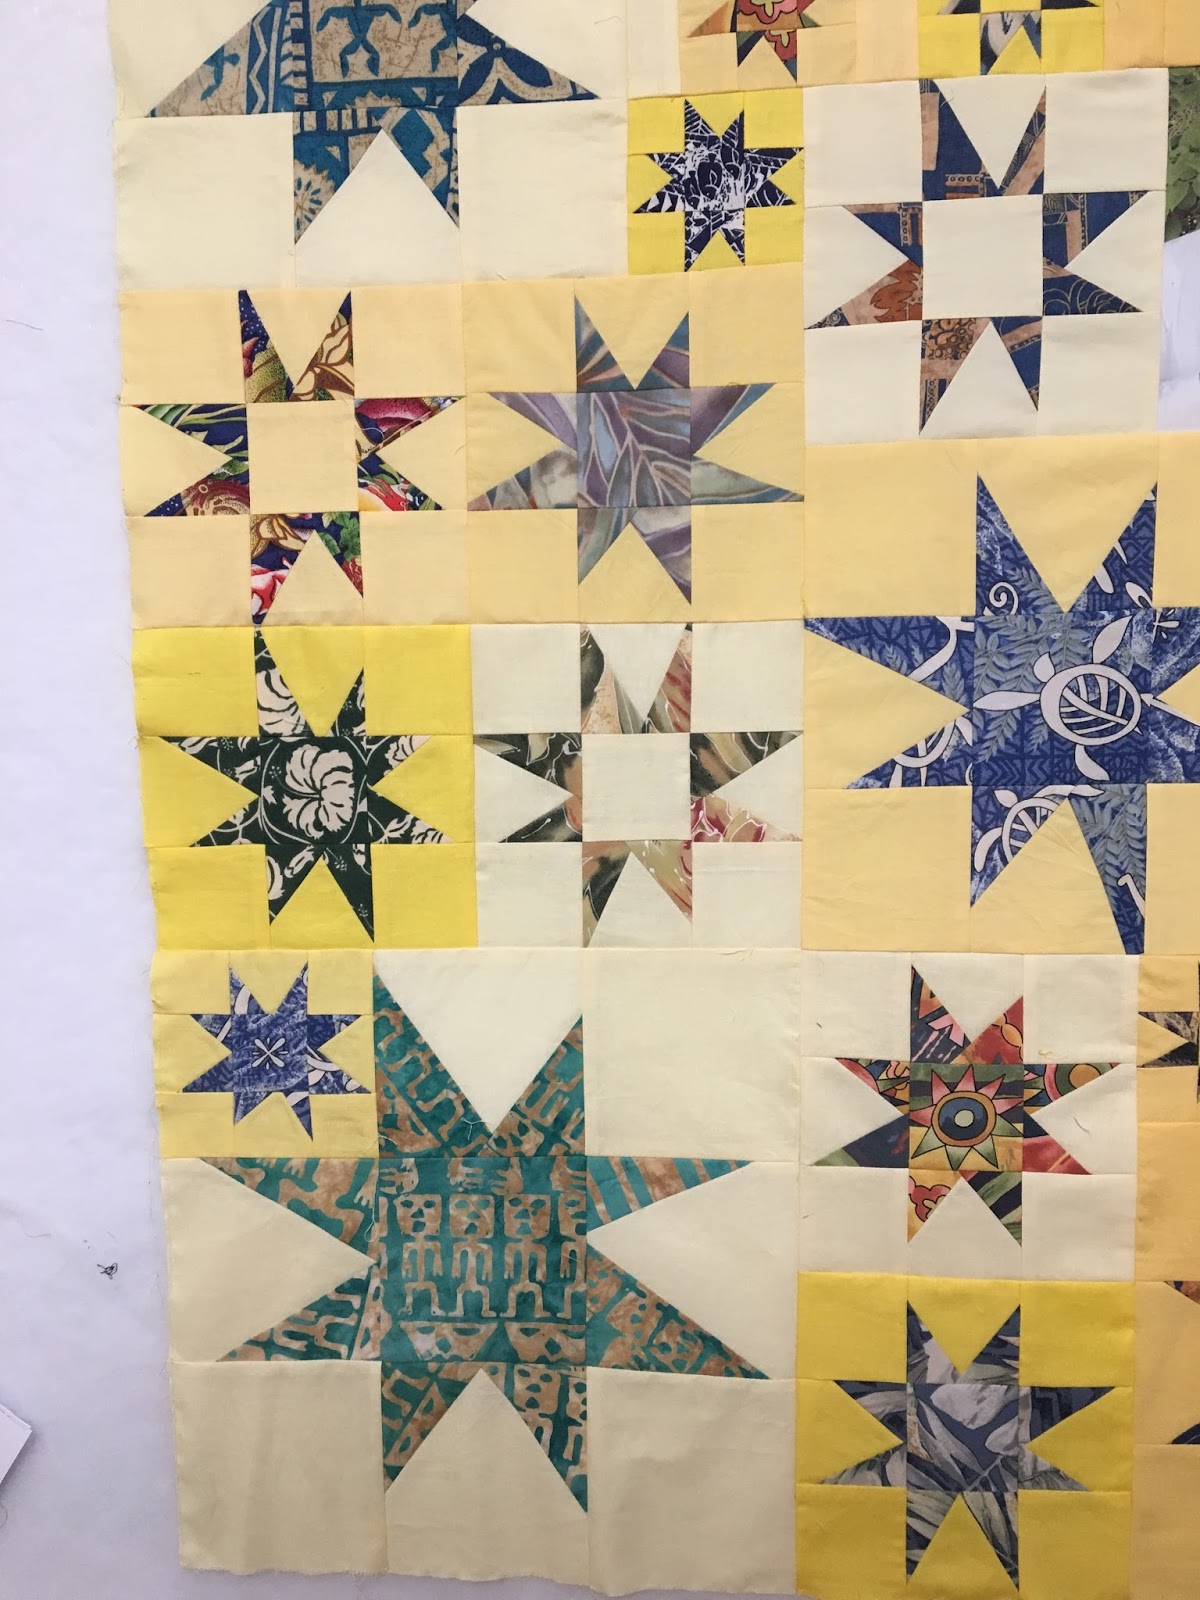
When I finally had the stars all together with the setting fabric, I could put my rows together. Staying organized is very easy now with our smart phones.  A few quick pictures and you have captured your layout.


Once I had the center together, I could finalize the colors for the outside edges.  Plus I wanted to use the 1/2 diamonds for the side pieces and they were on order.

Close up finished edges.


Corner edges still with paper in behind them.  I am a thread baster when it comes to EPP.  I've tried fighting working with glue sticks, and for the record, the glue stick won.  So I continue to baste with hand quilting thread.  It does require a bit of time to pull out the threads, but I am pleased with my results so I stick to my method of choice.  Chocolate and vanilla, right?


Once I removed all the papers and got to the outside edges, I finished the process at the ironing board.   As I removed the papers, I gave the outside edge a quick spray of sizing and pressed with a hot iron.  Remember, I said pressed, not ironed.  You really want to make sure it's an up and down motion, not back and forth.  The edges are bias and I wanted to take care to keep a straight edge. 

I did one side at a time.  After it was pressed, I took it to my machine and did a line of stay stitching about an 1/8" from the raw edge.  This does two things.  It stabilized the bias edges, and keeps the seams from popping apart.


Once it was ready to quilt, I decided to quilt it with the KISS method.  Keep it Simple  Straight lines using a beige/cream So Fine thread did the trick. I also kept the binding narrow, and this is a single fold that started at 1 1/4"

Texture.....
Detail...........

Back and binding.  I used a wonderful Barbara Brackman print that I've been hoarding saving.

Another question I'm regularly asked, "How do I get my string fabric for my quilts?"   Easy, I save the trimmings.

See the thread line below?  Cut off the edge where there's stitching from the quilting process and pull the batting off.

And throw it into your strip basket.  That's one of many ways I accumulate various sized strips for later use.


Here are the details of the finished project.
13 rows
7 full stars
6 full 2 1/2 stars
49 stars + 36 stars (510 diamonds) + 12 1/2 stars (24 diamonds + 24 1/2 diamonds)
280 full background diamonds
14 1/2 BG diamonds
16 1/2 diamond triangles
814 diamonds
38 1/2 diamonds
14 triangles
866 total pieces
26.5 x 44.5 finished
Hobbs 80/20 batting
Straight line stitching
single fold binding cut at 1 1/4"

And yes, I've started another portable project.  This next one is 1" hexi's, 7 per block, 1" equilateral triangles as setting pieces, 12 per block, and 3" equilateral triangles as the joining piece for each block.  I estimate I might have that top finished by Dec of 2019.  I'll enjoy the journey!

Keep stitching,
Sharon

Friday, April 6, 2018

True North - Chevron Border Tutorial

The outside border on this quilt is a Flying Geese block, but with paying attention to your fabric placement, you can create this chevron design.  I'm using a package of 5" squares aka Charm Pack

This first photo is to show that I have 4 squares layered up and they should all be lined up on all sides before you cut.

Slice the stack right down the center and you will now have two stacks that are 2 1/2" x 5"

Take ONE stack and trim down the short side so your rectangles measure 2 1/2" x 4 1/2"


Take the second pile of 2 1/2" x 5" sections and sub cut them into 2 1/2" squares.

Now you will have one (1) rectangle that is 2 1/2" x 4 1/2" and two (2) 2 1/2" squares of each of the four (4) fabrics that you started with.

You can see in the photo below that I have folded over and pinned the 2 1/2" square to resemble the corners of the Flying Geese block.  This is your visual of what you will end up with.   Note the top red has no corners and the bottom cream has no center.  This is because you will be adding other fabrics to create a longer border section.


Draw a line on the wrong sides of your 2 1/2" squares.  Using the placement of the above photo, stitch your corner square onto the rectangle by stitching right along the drawn line.

You will see two stitching lines on the blocks.  That is because I sew a second line a scant 1/2" from the first stitched line.  See the next photo.

Here you can see how I use the left side of my presser foot as a guide, and it's close to 1/2" away from the first sewn line. 

You can see here the ruler shows this as 3/8" of a space between the two stitched lines.  I usually shoot for a 1/16" bit wider, but I don't worry too much about this.

Now I cut the corner off the block, and I use a scant 1/4" measurement from the first seam that I stitched.  The seam that is corner to corner is the most important so don't cut it too close.


Here you can see I've cut off the corners.

I do this to create a second (or bonus) block from the trimmings that many quilters just throw away.  I'm too frugal for that when the "bonus" 1/2 square triangle can be trimmed down to a very usable size. Set those trimmed off pieces aside and we will get back to them.  Now you need to press open your corner and add the second side to create your Flying Geese block.

 Again, stitch on the drawn line, stitch a second seam and trim off the corner.


Press open, and you now have blocks, that when stitched together in the correct order, will create a chevron strip. 


You can also create a scrappy chevron border by using fabrics that are in the same colorway and of similar value.  A design wall is very helpful when working in this style.  I find it helps keep me organized.


OK Lets get back to these "bonus" blocks.  I learned this trick from Bonnie Hunter.  She's loaded with great tips and tricks and this is one of my favorites.  Using my ruler with the 45 degree line that goes to the corner of the ruler, I line it up along the center seam line and find the biggest size that I can trim this block down to.  I know, sounds a bit backwards.  Biggest, but trimming down.  Stick with me!  I can trim this to a 1 3/4" square

It seems like sometimes I'm taking a scant 1/8" trim off, but this makes all my blocks the same size and then they will all work together.


See this one, same thing.  I can trim it to 1 3/4" square and have a perfectly good block to work with.  Would I make these blocks from scratch. No way.  But they are too good to put in the garbage.

Trimmed up and looking good!


Here I've put them together into a pinwheel block that will finish out at 2 1/2"  We can all use pinwheel blocks in a baby quilt, in a border, as a center of a larger block, right?


Look at the heaps of "bonus" blocks you will create if you use this method of making a bunch of Flying Geese using this method.


I hope this post will help you make a chevron border, or even a few rows of chevron Flying Geese. It just takes a little extra attention to keep your colors all organized, but I think it was worth the effort. 

Do you create bonus blocks?  I think they're fantastic, and it's great to have a bag of extras every now and then. These ones haven't got a home yet, but I'm sure there will be another Americana quilt come out of my studio one of these days!

Keep stitching
Sharon


Tuesday, April 3, 2018

Quiltmaker - True North

It is such a kick to have one of my quilts published.  This month Quiltmaker May/June has my True North Medallion styled quilt on pages 12 - 18.  Gwen Marston got me hooked on medallion styled quilt making and I think if I could only make one style for the rest of my life, it would be this.  I used lots of Minick and Simpson fabrics for this piece, they do make some of the best Americana inspired fabrics.  The outer border was created using charms, so if you have a pack or two languishing in your studio, this is a great way to use them all!  Yes, even the ones you think you don't like.  They all play nicely together in this kind of border.

 
Used with permission Quiltmaker May/June '18 Published by F+W

The best part with Medallion styled piecing is you get to choose the designs for every round.  You can try out techniques but not be committed to an 80 x 80 pattern.  It can be a border that is only 6" wide and 24" long.  This pattern finishes at 52 x 52 but you can keep adding rounds to make it as big as you want.  Add your our design elements to create a one of a kind piece.  Easy, right? This pattern included English Paper Piecing, a template pattern for the center, bias vines that I stitched down by machine, hand applique for the EPP, and a fun design element in the outside border.  I went very scrappy, but this would also be fabulous in batiks.

Each round on this quilt seemed to take on its' own life.  The center star is 20" square so it was a perfect jumping off point. The magazine has instructions for appliqueing the center circle, but if you want to try your hand at insetting the circle, go HERE for a step by step photo tutorial.  Slow and steady wins with this center block.

tUsed with permission Quiltmaker May/June '18 Published by F+W

There are several great patterns in this issue. Carnival by Scott Flanagan looks like a fabulous skill builder pattern and Erin Russek created the beauty on the cover. I worked with Erin on this pattern and she was wonderful. What a thrill to have a pattern in this magazine, this is my first piece with F+W and it was a terrific to work with them.  Go grab your copy, it's on the store shelves right now.

Used with permission Quiltmaker May/June '18 Published by F+W

Check back for a few tutorials from me and start working on this. You'll have it finished in time for July 4th!


Keep stitching,
Sharon

Monday, March 12, 2018

String Steps Workshop

If you have baskets and boxes of scraps and strips, this is a perfect workshop for you.

STRING STEPS is made from all those left over pieces, fabric that you paid good money for, but now don't know what to do with.

March 20, 2018  10 a.m. to 4 p.m.  Whidby Island, WA  Details at bottom of post.


I couldn't resist taking this picture when the cherry trees were in bloom last year.  This sample has been created using dark/light combos with all the lights being shirting prints.  I mixed the darks with everything from red to purple to cheddar to black.


It would be fantastic in any "low volume" mix along with brights from Kaffe/Brandon.  I can see it done with lots of fushia's, purples, reds.  That's the beauty of these pattern, it will reflect your own basket of scraps.


Your own fabric preferences will shine.  And the best part?  You don't have to cut exact measurements of your strips.  I will show you have to create the block using your strips and strings, and when your block is finished, it will be flat, straight and square.


Quilters on the Rock 
This is the host guild that is offering this fun workshop.  Here are the details:

March 20, 2018  10 a.m. to 4 p.m.

A few spaces are still available.  No credit card available at the class, so cash or check please.  Price for non-member will be $35, checks payable to Quilters on the Rock.

Contact for the class. Linda Postenrieder,
Email   post82 at whidbey dot com   or
Call (415) 235 - 9413

If your scrap bag is full of color and you want to make a high impact piece, bring it on.  I love how this color version is developing.


It's a fun way to create a quilt from your scrap bag, and this quilt will be a reflection of many quilts that you have already made. 

If you are interested in having me teach this at your guild, or have a trunk show, please contact me.  I'm available for events and have openings this year and have started booking 2019.  I'd love to bring my show on the road and am available to work in the USA and CANADA

Keep stitching,
Sharon

Wednesday, March 7, 2018

Perfect Timing

This is my second go round with this bag of fabric.  It's now Great Grandpa's shirts that are going to be used to create a baby quilt.

Yellow was the color of choice for the background color, and I got to use a stack of different shades of yellow.  This commissioned piece had a due date of April 1, but I knew the baby was due mid March.

So I got out my trusty tools, and my Sisters quilt show coffee mug and got busy.


When making this type of quilt, I focus on the blocks and color choices first.  I figure I will figure out how it all will work after I get the majority of the blocks pieced.
I put the finished blocks up on the wall, assess the open spaces

and then start the math.

Once I get this far, I just have to make the last few blocks in the correct sizes/colors to fill in the holes.

Then the next part of the math happens.  The part where I have to figure out how to sew the blocks together to make a rectangle.  Half seams are my best friend and I love the final look when I use the half seams.  No straight seams, no columns or rows.  Makes for a very interesting finished top.

The dark lines are my road map to piecing the top.  I work in sections, and then work the sections together.


Can you spot the filler strips?  Faster than making a third small star block, plus it adds interest.

The small star block is inset by using half seams.

No direct line top to bottom or across the quilt top.

Here is the finished piece.  All the stars are made with Great Grandpa's Hawaiian shirts.

The quilt got finished last week, way ahead of my promised date of April 1.

When I contacted my client, she was so excited to hear that I was finished.  Mom was at the hospital, and had the baby that day!
I'd say that was perfect timing!
Now I have to get busy on the next project.

Keep stitching,
Sharon