Sunday, December 26, 2021

Journey to Camelot

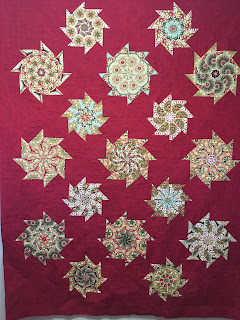
This pattern was featured in Quiltmania 111 - 114 in 2016.  Yes, I'm late to the party, but since there is no schedule on starting a new quilt, I'm OK with this.  The pattern caught my eye after I saw it finished. My friend gave me a private bed turning at her home full of quilts and antiques, and I knew I had to make this pattern.

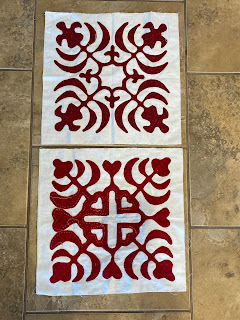
This is block A, stitched but not pressed.  It is also missing the corners that consist of 2 triangles on each side.  I've been cutting them as I go along and will add them once my blocks are on the design wall. Petra's PinDot in Lighthouse was chosen for the background so I ordered a bolt from Reproduction Fabrics and HERE is the page with all the available colors.

Having a cell phone to snap pictures is the  best way to keep things organized.  I have created a folder in my phone and now I have a color road map when I start stitching these blocks. This block as 60(?) pieces that needed to be picked, traced, and cut out....whew!


The other advantage of having a phone handy is that you can revisit your choices before they are stitched together. (sort of)  I did stitch the little triangle to my fussy cut Margo Krager gorgeous ombre floral and have since replaced it with a different fabric.  She also has solids in ombre and they are beautiful.  I love the Betsy Chutchian print from Elinore's Endeavor collection for the background pieces.  With a quick search, I could only find the brown or pink colorway, but I'm sure if you searched a bit more the blue might still be available.  This whole line is gorgeous.


Being scrappy, it takes a lot of time to pull, audition, press, draw, cut, layout, refold and put back each piece of fabric. I've spent over an hour just prepping each block, but this is the time consuming part.


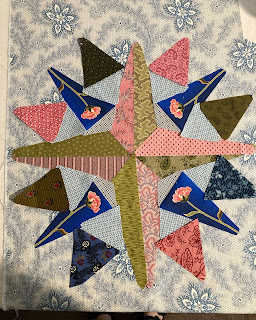
I couldn't resist fussy cutting this block with this paisley.  Having all the photos in one folder allows me to see how the blocks will play together without having to transfer all the pieces of each block to the design wall.  This one will get along quite nicely with all the other blocks.  Oh, how I love a good paisley!

This center fabric has been waiting in the wings for it's place in this quilt, and the center of this block is exactly the right spot! Yellow, navy, pink paisley! Small pieces of these types of fabrics make big impacts.


The fabrics in both rings have also been pulled and set aside, waiting for the right block.  I'm super excited to start the stitching.

There is a border of 1/2 square triangles and each block has 2 triangles to complete the square. I've been cutting these as I create each block.  Great tip from my friend.  Since this pattern was published as a 4 part series, these are some details that are good to know before you put all those fabrics away.


Along with my photo of each block, I have enclosed a line drawing road map in each block that is bagged up for easy stitching.


Yes, this is a messy project.  Believe it or not, I've cleaned up this area several times and it continues to look like a bomb went off.  Oh but it's a glorious mess, one that will result in a beautiful quilt.


I hope this post gives you a peek behind the curtain, so when you start to see my finished blocks posted on my IG #grassrootsquilting you won't be thinking "oh my, look how fast she works" These types of projects have a lot of "behind the scenes" work. The slogging through parts, the process parts. The fun part is having pieces of fabric ready to stitch together in the evenings, the early mornings when you are the first one up, the few minutes waiting in your car for your appointment time. This is how these glorious quilts become a reality. 

 From my messy to studio to your home, I am wishing everyone good health, time with family and friends, getting fresh air and activity, and, of course the very best of the Christmas season. Keep stitching, Sharon

Wednesday, December 22, 2021

Playing with Hexagons

 This first pattern is from Brigette Giblin and you can purchase it as a download HERE.  I would put it in the catagory of Advanced Beginner.  Her pattern writing could have been a bit better, but if you take it slow, pin and double check before sewing, it will come out lovely. 

I've also had this Giraffe print from Christopher Wilson-Tate that has been pulled out and put away many times in the past few months.  Too many hand projects on the go at one time results in some just getting second fiddle to my stitch time. 

None of these blocks are set in stone, layout wise, but the gist will be motifs surrounded by a variety of hexagons. 


This little container is now busting with hexi's, as this is a great "take along" project and building up the design tools is simply a matter of working in production mode. 

The fun part is when the designing begins.  Nope, when using the giraffe as a center, only one round of hexi's will work!


Much better.  I have also switched gears on a fabric that will be used to join on the hexi medallions.  At least today I have a "final answer"  Who knows what that answer will be in 2022 when I get back to this.

In the meantime, I will be spending Christmas at our "new to us" vacation home. No, I'm not retired yet, we have rented it out for Jan - March, but this will be our last trip to finalize all the little details for our guests.
I see a "Turqouise Door" quilt in my future.

Merry Christmas and I hope you find a few minutes to stitch during this busy time of year. Keep Stitching, Sharon

Thursday, December 9, 2021

Sarah's Revival Update

It's been quite some time since I've updated this long term project.  Sarahs Revival by the late Sue Garmon.  Her patterns are all available at Come Quilt  and this pattern can be found HERE.  The good news is that I'm still working on this. It's slow going but I continue to move the blocks forward.  Here are two more and since this photo was taken, the bottom block has been completed.
Putting the finished blocks up on the design wall every so often is a good motivator.  When you can see how far into a project you are, it may keep your mojo going.  I know it works for me.  Also posting on IG has kept me engaged with this project, you can follow along at #grassrootsquilting   I've used this as a traveling project so it's been important to have blocks prepped in advance. 
My method of applique is back basting and the longer the block sits prepped, the easier it is to do the needle turn.  With some of the areas being less than a 1/4" in width, it really does make things a bit easier for me and helps with getting smooth edges on those outside curves.  26 blocks have now been completed.  They are all reproduction reds, but a nice variety.  My background choice was RJR Supreme French Vanilla.  The blocks will all get trimmed at the same time. 


 And in non quilting news, my dad turned 87 in mid November.  We got to celebrate with him in Casa Grande, AZ 

This year has been extremely busy with longarm quilting for customers as well as moving.  I've moved my studio, my condo, my guys condo, cleaned out my dad's house in AZ and moved him into a new space that also needed cleaned out and most of the contents moved.  Oh and we've also renovated this year.  We have done this as well as make 5 trips to AZ (that's how I've got so many blocks completed) to make sure my Dad had a place to be a snow bird for a few more years.  The upside of this was that we also bought a vacation place in AZ; too bad I'm not retired yet!

Keep stitching,

Sharon

Saturday, December 4, 2021

Shortbread Cookies

 This post is a copy and paste from several years ago.  I thought maybe since there are a lot of new IG followers, some might make their way over to grab this recipe.  It's the big day, the first weekend of December, and that means my cookie production begins.  It sounds a lot more arduous that it really is, and that's because I now only make this recipe, over and over and over again.  Why mess with a good thing.  And here is a few quilty photos since this is a quilting blog (or it pretends to be)


Change isn't Alway a Good Thing

There were a few emails asking for my shortbread cookie recipe so I'm sharing it here today. I know I said it came on the cornstarch box. We never had this recipe written down because it was always on the box. Then they changed the box. I called several people and had them check their cupboards for an old box. What relief when Joann had one in her kitchen. Then I wrote down the recipe. They don't even put cornstarch in a box now. It's in a plastic tub. But that's another whole issue. Here is a recipe that you need to write down, or copy and paste.
1/2 C corn starch
1/2 C icing sugar (powdered)
1 C flour
3/4 C butter
Sift dry ingredients. Mix in softened butter with a pastry cutter. Continue mixing with a spoon and do the final mix with your hands.
Roll into 1" balls, flatten with a floured fork on ungreased pan. Bake 300 degrees for 20 - 25 minutes (edges slightly golden)
Makes 3 dozen cookies
Cool on a rack and enjoy! For a more festive display you can add a little piece of green or red candied cherry on top before baking or drizzle with chocolate after they cool.
Store in a sealed tin.
Sharon