Showing posts with label solids. Show all posts

Tuesday, May 26, 2020

Color Collective 6 Pointed Stars

This post could also be titled "Five Star Review" for Sewtopia and their 6 month Color Collective. For six months you will receive a bundle of solids along with a pattern by Tara Faughnan.  The one I'm sharing today is from the first season.  It was the last pattern and I wanted to hand piece these stars.


I made about 65 stars and I pulled fabric from previous months to give me a larger variety.  Here I am contemplating putting a large hexagon between the stars, but the quilt seems to be so large.


I went with using a diamond between each star.  The next part was choosing a color for the setting diamond.

Taking a quick look using the black and white setting on your phone/camera  will help determine dark sections in your layout.

Once I started joining the stars with the black diamonds I realized that piecing the whole row together might be a bit awkward when joining all the rows together.  I decided to work in chunks.  

Here I have the top section pieced into  quadrants.   Putting 4 quadrants together was much easier that working with full rows.  Once this was together, I worked on finishing the edges.

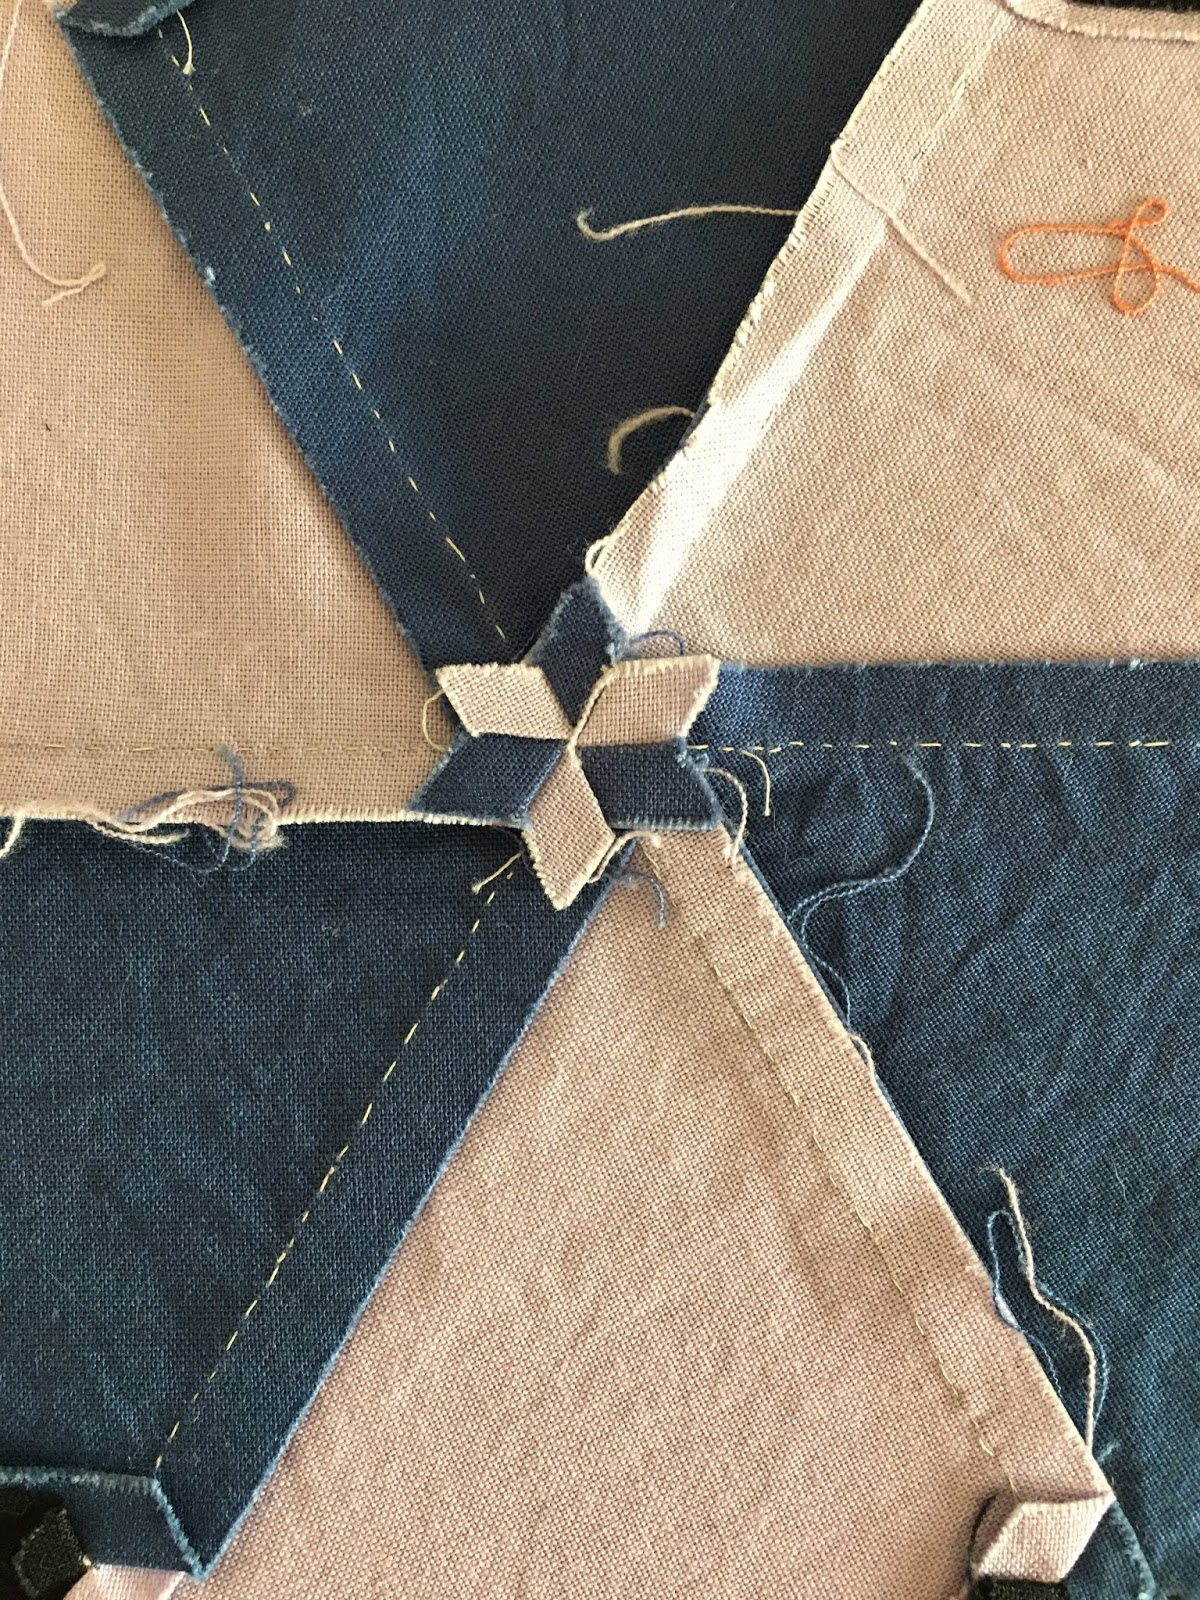
Two hours of pressing resulted in every seam spinning and laying nice and FLAT.  That's the beauty of hand piecing.  You can manipulate your seams. For this reason,  I never press hand pieced units until they are all together.

Oh, the sweet satisfaction of my star centers!

So what's so great about the Color Collective?  Let me show you.  Here is my own selection of solids that I've accumulated over the years.  Notice how many greens, creams, and cheddars to browns I have?


Here are the untouched bundles of the selections that Tara curated for Season 1 and 2.  Notice all the berries, limes, aquas and purples?  Yup, she pushed me over the edge of my color box.  I have worked with combinations I would never have chosen, and making decisions based on a selection of colors chosen by someone else is quite freeing.  The patterns are definitely aligned with working with solids and you have to up your game as every seam shows. 

I have done hand pieced 6 pointed stars before, so this technique was not new to me.  Making all the centers as good as I could mattered when working with solids.  This series was about was trying new color combos, learning new techniques (as I have with many of the other monthly patterns), and stretching my boundaries.   I've done 2 series, they have a private FB page, video demos, FB chats, IG chats and the pricing is excellent.  Plus members get a discount for the 6 months on any other purchases from Sewtopia.  If you are not familiar with Tara's work, check out her patterns.  They are clearly written, great line drawings and her social media is a wealth of inspiration.

This piece finished at 62 x 64.  When oriented this way, it can look more like Tumbling Blocks.  Any way you look at it, I think it's fantastic.  Once it's quilted, I will trim back the top and bottom edges, I used pre made stars along the border, ones that were extras that didn't make the cut for the center.  Black batting will be used and I am going to hand quilt it.  (who know when!)

Keep stitching,
Sharon

Sunday, January 27, 2019

X Marks the Spot - Color Collective Month Two

I've joined the Color Collective put on by Sewtopia  I would highly recommend getting in on the next session of this program as the first two months have been fabulous. Month 2 fabric arrived and I pulled out my bins of solids.  This time I had 3 colors that were close to matching.  This adds up to 19 new colors that I've got to work with in the first two months.  Talk about stretching outside my comfort zone.
Month 2 was all about Foundation Paper Piecing.  I've done this before, but have never made a whole top with this method.  It took me a bit to find my tools; postcard from my Mom and Dad on their Alaskan road trip, and my Add a Quarter ruler.  A must have ruler for this type of work.  And sew it begins.  Cutting and trimming and pressing and trimming and sewing and trimming and pressing. 

First three blocks using 9 of the 12 colors.  This project consisted of 25 blocks so I was trying to do math that would have me use each color in each of the 3 sections of the pattern.  I got dizzy after the first batch of blocks.

I kept at it. I spent about 5 hours in the studio yesterday.  It was interesting how my mind moved to certain things with color combinations.  One set had me think of marching band uniforms, others reminded me of school colors, NFL colors, etc  That was a tough hurdle for me.  I love the combo of green, navy and grey, but that screams Seahawks!
Here I've got enough combos done to start assessing the last few blocks for color and value.  I do love a good gold (cheddar) and had to restrain myself from using it too much.  At this point, 20% of the blocks had gold.  And lets talk about the fuchsia.  I had even more blocks with that color.  What you can't see (due to my less than stellar photos) is that there is a bright watermelon color and another color that looks like a creamsicle.  They seemed sharp, vivid, almost neon to me.  I finally pulled out one offensive block and set it aside.


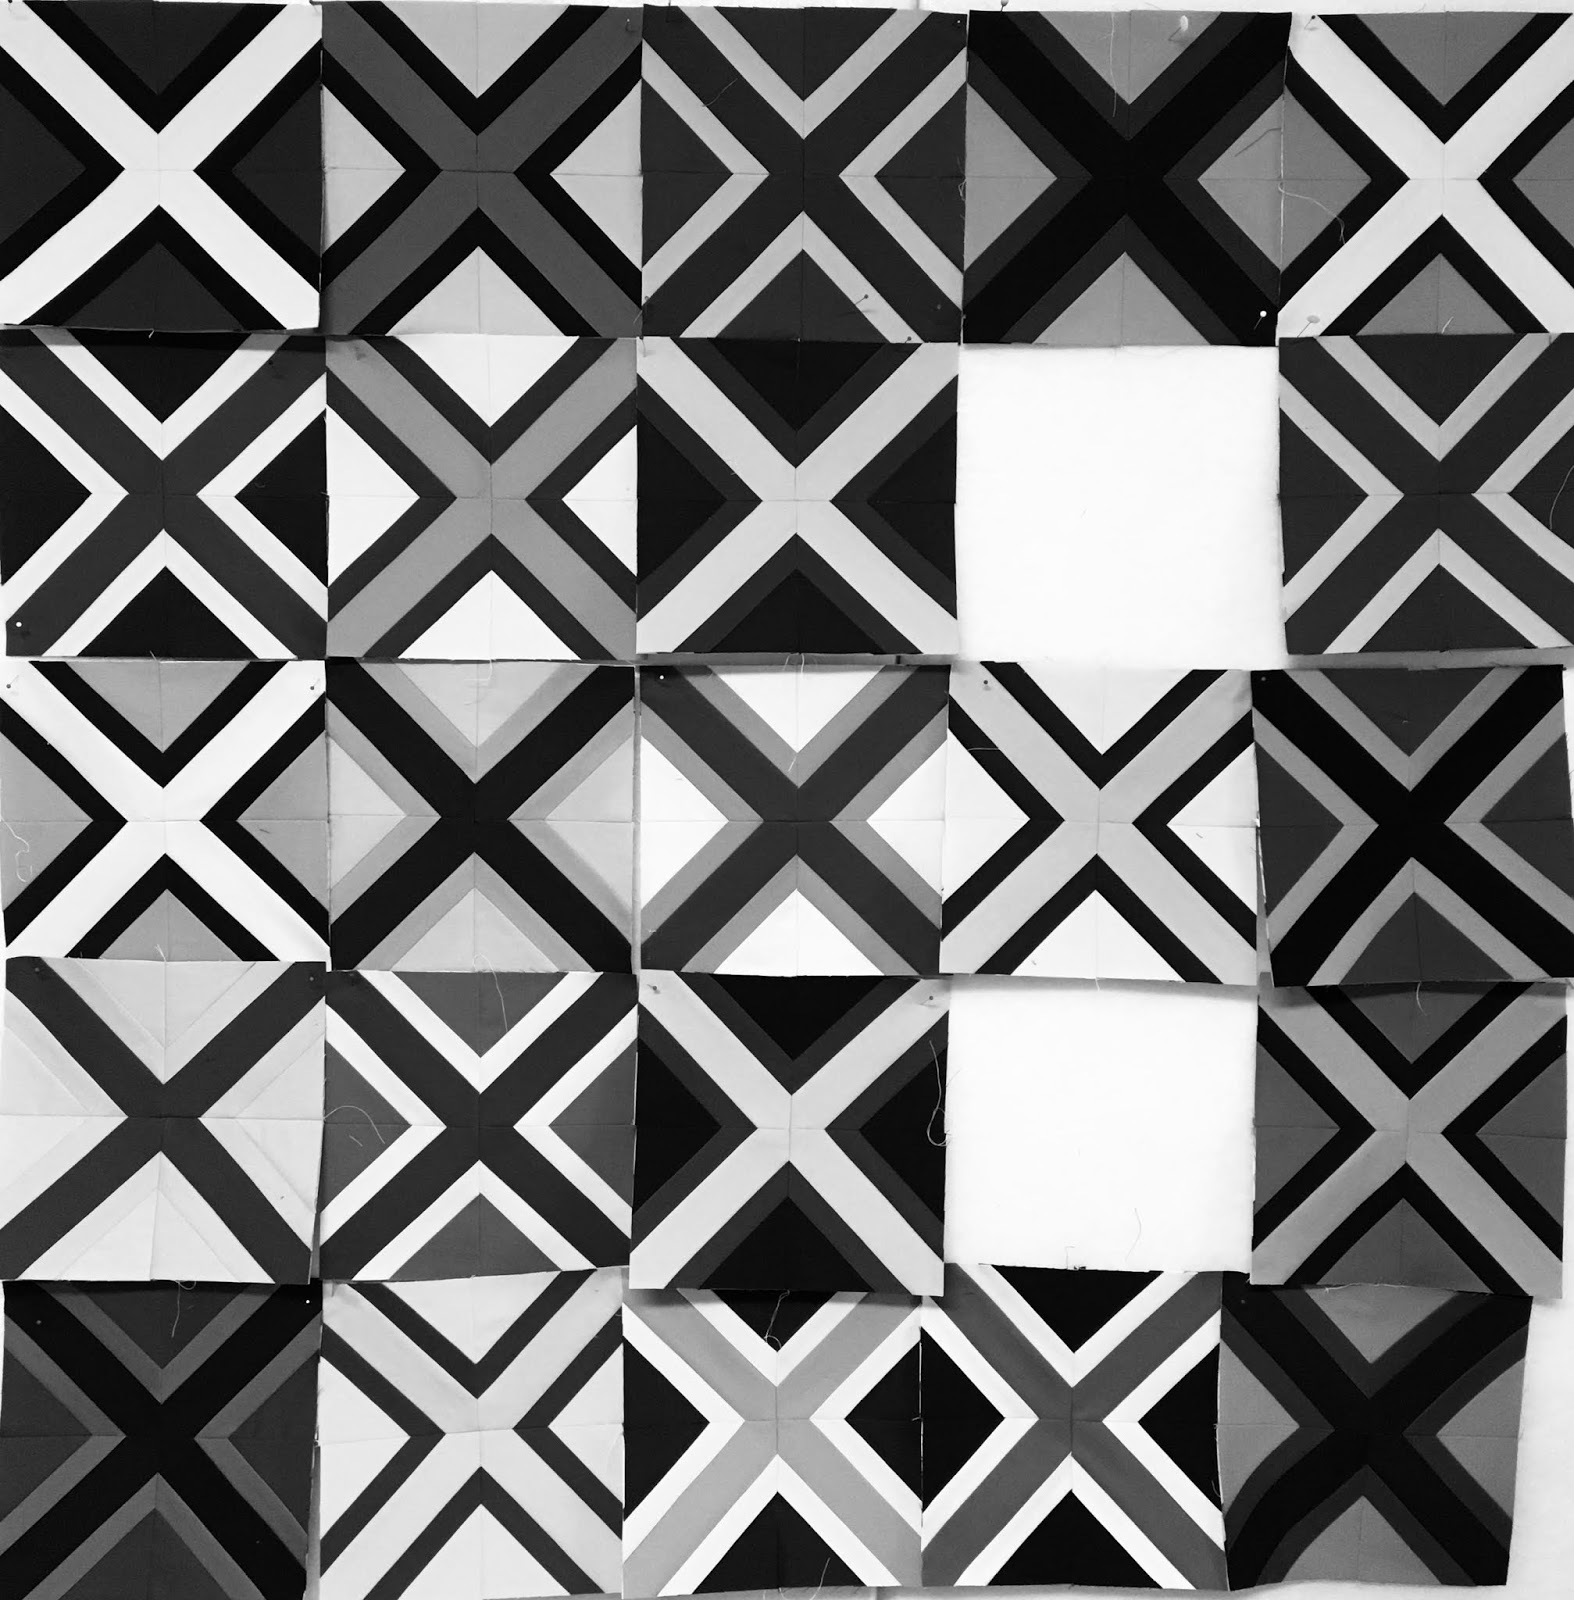
I went to my trusty black and white setting to see only value.  This makes you look at things in a very different way.

I made a few more blocks and only had 2 holes left to fill.  At this point, I put back the awful block as I added a touch more of that particular color and things started to balance out.  This was pretty dark along the right side but things were coming together for me. 
My last two blocks started with the outside triangle colors.  I wanted to make sure they were not the same as bordering blocks and I went with the dusty blue and fuchsia.

This next photo shows how I worked with dark and light strips.  The bottom part shows that when I put the burgundy fabric on the coral, I left a few threads of the coral showing.  When I flipped and pressed, (the top part of the photo), there is no shadowing of the dark color.

The finished block.  Oh how I loved this dark burgundy with the dusty blue.

In the last block, here came one more of these (hard for me to work with) colors.  That light mint green........ack!  But it really works in the whole project.


Here was my "not so final" layout.  I started back with the black and white photos, did some rearranging and committed to a layout.  This project is one of those where you can move and move and move and never come up with the "perfect" layout. 


I called it done, and sewed the blocks into a top.  Yes, on the left side I have two green X's on top of each other.  Geez!  But I am very pleased with the lessons I learned while making this one.  For some reason my blocks did not all nest together, which has my brain a bit puzzled.  I will be back in the studio doing some testing on why that happened.

I was concerned that my top would look fuchsia and gold so I kept backing off those colors.  They were two of the colors I had in my own stash and I used as second lighter value of gold in some blocks.  I also cut into my piece of fuchsia fabric, so in theory, both the gold and fuchsia should probably not even be in this photo.  These are my left overs from 1/2 yard cuts of all the colors.  You can barely see the dark burgundy, I sure loved using that color.  The color that was used the most was the dark green, and with 3 other greens in this range, I struggled to not have a green quilt top.

These were my colors that I pulled in.  A very dark navy, a dark forest/teal green, two shades of gold and a dark raspberry shade. I also added in a grey as that gave me an extra light without pulling in more of the corals and mint greens.  I did love the baby pink, but again, used it sparingly.

Last shot the finished top.  I love it.  Combinations were used that really stretched my comfort level but now I have a few more combos that I'd like to try out on a bigger scale.  The bottom row holds my favorites.  Left corner is burgundy, dusty blue and fuchsia,  and the middle bottom is gold, pink and dusty blue.  That was my biggest Ah Ha moment.  Gold, pink, blue.  I LOVE this combo.

So thank you Tara Faugnan and Amy at Sewtopia, for a fantastic month 2.  If you are on IG, you can see posts with the hashtag thecolorcollective  Check it out to see how others interpreted these color combinations.

I'll leave you with a fantastic sunset that we had on Friday evening.  Birch Bay at it's finest!


Keep stitching,
Sharon

Friday, January 4, 2019

The Color Collective

Happy New Year!  I hope everyone had an enjoyable Christmas season, and that as we move into the first weekend after New Years day you are ready for some stitching, instead of cooking and cleaning!

We do not get all Amazon crazy at Christmas. I ask for a tube of my favorite hand lotion from the drug store.  But this year I also asked for The Color Collection six month subscription from Sewtopia and Tara Faughnan

Twelve 1/2 yard cuts of Kona solids, curated by Tara.  You also get a pattern each month to download and there is a FB page and IG group for all members.  It's a fabulous value and I wanted to stretch my color confidence this year. Month 1 started with this group and the pattern Color Pop


This is just a test, do not adjust your color monitor, repeat, this is just a test.  I waited and waited and waited for the UPSP local office to deliver my fabric.  I guess 8 days to get a 2 day priority that looked like it had been run over a few times wasn't too bad, right?

I pulled some fabric for at test run on the pattern and process and made these 4 blocks.  They are 6" finished.
 After cutting out cardboard templates for the pattern, I remembered had a stacks of circles I had cut out when I started longarm quilting.  And I had a rotary cutter for circles.  I was in business.


I grabbed a stack of 4 1/2" strips I had pinned to my design wall, (remember, I'm still waiting for my 2 day Priority package), layered them 4 high and cut out squares and circles.

Although color seems to get all the glory, value does the good work.  Second column from left, top two blocks.  In real life, they looked good.  Very similar color and I thought it gave some interest to the piece.  Note: I think it's more challenging working with such a small finished size.  This will be 20" x 20"  

After flipping my camera to black and white, I knew this was just better, and I committed to the layout.
Here is my finished piece.  Circles are 3 1/2" and the block finished at 4"  I can see how it need tweaking if I want it to have the same look as Tara's pattern.  The backgrounds needed to be trimmed a wee bit more so the circles are almost touching.  I love this and it will be gifted once quilted.


So getting back to my 2 day Priority package, it finally arrived.  I can't wait to see all the colors in the package.  I have a *few* solids in my stash, so I was hoping some of the 12 colors would be different from what I have already.


This one came up as a close match to what I already had.  Not a surprise as my favorite colors are red and cheddar and this falls into that gold/orange/cheese colorway.   And yet, as I tell you I love red, note that there is virtually NO red in my solid bins.

The second winner was this lovely shade of fuchia.  It's on the bottom, and I had 2 that were close.

One would think with 20+ greens in their basket, surely they would have a match.  Not even close to something in my bins.

The moral of this story?  Let someone else pick your fabrics once in a while.  If you try it, you might like it.  I'm super excited to see what each month brings. January is paper piecing, and I've done a little bit of that.   I'm committing myself to work through each pattern using the colors and methods and I can tell already that I have been pushed outside my box. I think that's a good way to start a new year.  Tell me what you want to learn this year?

Keep stitching,
Sharon

Saturday, October 28, 2017

Solid Foundation

Mail was delivered this week, but I've been afraid to open up one of these books. The Red and White book is fabulous and will be a great inspiration for another two color quilt.  I just boxed up a 90 x 90 quilt and shipped it off for a photo session, so I'm in resting mode with solids.  As for Maria Shell's new book, Improv Patchwork, well, I still haven't opened it yet. 

Before I can let my mind go down this crazy train of a new start, I felt it was time to make this happen.  THIS is prewashing my stash of solids. Yes, it's been laundry day in my studio for the last few WEEKS!  Drying rack has been a fixture in the hallway outside my laundry room.
Piles of pressing have been reduced and replenished beside my ironing board.  This has been ongoing for literally weeks.  But it's years of buying solids that has caused this explosion.
I'm a prewasher, a die hard prewasher for all quilting fabrics.  They go to the laundry room before they get into my sewing room......with the exception of my solids.  For some reason, I just didn't prewash my solids.  I ran out of drying rack/shower bar/ironing board space so I resorted to the lid of the washing machine and all around it!  Quilters will understand this.
Pressing has been an intermittent process.  I would press a binding, then grab a few pieces and press. Iron was plugged in as soon as I entered the studio, and I would press a few pieces while my coffee dripped. Before leaving at the end of the day, a few more pieces would get lightly pressed.
And now most of them are folded up and back in my storage bins.  Loosely organized, but that's for another day.
There *might* be another stack or two left to migrate from the cutting table to the storage bins.
I might need an intervention, or maybe I need to read Maria's new book, put a new blade in my rotary cutter, and get busy.  OK, I have been busy, it's all been on the down low, but let's just say, 2018 is going to be exciting!

It's Saturday, it's sunny and glorious in the Pacific Northwest.  A perfect day to be outside, checking out all the amazing colors Mother Nature has provided us with.  And of course, I have a few more solids to press and fold.

Keep stitching,
Sharon

Saturday, April 1, 2017

Gwen Marston - It's a Wrap

Photo heavy, word light.  Here are the shots of some work in progress pieces and some finished results from our workshop.  With 20 people creating in one room, there was a bit of sensory overload for me.  I kept focused on my piece and soaked up so much from those around me.

Matt - Seattle Modern Guild.  You should stalk him on IG  @odditease  Everyone tries to pull their hands out of the shot.  I happen to like them in the photo, after all, these are the hands that created the piece that we are enjoying.


Finished? not quite.............

Matt finished and if you check out his IG, you will see the hand quilting he has going on.
Making parts....

Auditioning background colors.  Vera worked her pieces from lots of yellow/green on the right to lots of pink/turq on the left.
Finished the abstract piecing and onto making Liberated Stars


Sally and Mary came up from Seattle to say hello, and lucky for us, Sally brought her corduroy quilt.

LeeAnn and Merry.  Square in a square by Merry, cherrywood fabrics.  Still in process, as a fabulous border showed up a bit later.

Leah M&M for size reference.

She rocked the small piecing and created some wonderful patchwork.

Finished composition. Such lovely work!

Paula with her Mexican Hat center and liberated rounds, medallion style.

Cheryl - we realized we have taken 3 different Gwen workshops together. She has good taste in teachers *vbg* Don't you just love this? She did the patchwork, then cut her big square in 4 to make the outside triangles. Her sewing buddy had some great advise. Stay stitch just beside the cutting lines "before" you cut on the bias. Still more to happen, but not enough fabric or time to have a finish.


Justine rocked the hour glass block with brights all around.  This piece is so lively. 


Fern, as in IG @fern_royce, or www.fernroycequilting.com came up from Berkley to partake in Gwens last blast class.
Fabulous work.  She teaches and lectures.  Check her out!


Ferns sewing buddy, who's small 4 patches took my breath away.  I just had to go make a block for reference.  I love the partial seam technique she used to surround the center. 


Elizabeth continued on a current project she had.  Such good colors in this piece.


Mary green lib log cabins

Gwen shared so many techniques and here is a collage of processes.  Marilyn now has the best note / sketch book to take home.


Merry shared a wool quilt she finished.  I love a good churn dash.


LeeAnn aka NiftyQuilts working on the floor.

Nifty had the floor with her wool strippy.  Is is recycled? or upcycled now?  I just know its a great quilt and someone will be lucky to get this.


Norma also pulled out the hourglass medallion theme.  Love the curves added in the first round.  There's more to come on this piece, but again, time got the best of us.  Norma and I have also been in several of Gwen's workshops in the last few years.


As Gwen continued to show techniques, the work became more complex.  I see Maui when I look at the piece on the right.  Such great colors.


I call this one Vision Accomplished.  I had an idea in mind; sea glass  I came with a stack of fabrics that worked with my newly painted condo and I managed to see it through to fruition.  Strings on the right were from the strip ends.  They have made their way into another piece already.  When the iron's hot, right?


Gwen and I, our last hurrah............

And like the fields of Snow Geese that I saw while leaving LaConner,  Gwen drove away.  It was a bittersweet workshop, knowing that she has truly retired. 
I asked her if she considered taking up quilting in her retirement, she replied, "I've thought about it"

Gwen, thank you for empowering so many of us to find our voice, to be confident in our decisions, and to defend our work.  You are a true gem in this industry and in this world.

Thank you
Sharon