Tuesday, April 21, 2020

Clean Up as You Go

As we all continue through this very trying time in our lives, I thought I'd get back into a bit of blogging.  This project has been in the works for at least 4 years. This is a sampling of the 81 blocks that I have finished.


It all started when I saw a 16 patch blue and white quilt at a guild presentation.  Somehow mine turned into a 49 patch.  One by one, the squares got cut and sewn together.  No strata's were used in the making of these blocks.


My rows of 7 blocks were together and I had four bundles left to sew into blocks.  A light spray of Magic sizing and the blocks were pressed.


Here is my TIP.  After pressing your blocks, clean up the threads that are between the seams.  Sometimes its a frayed thread from the fabric and someitmes it's a thread from sewing.  Some of them can be very hazardous when getting your quilt longarm quilted.  If the hopping foot catches on a thread that is sewn into the seam, it can cause havoc.  Here is a freshly pressed block.
And here is a cleaned up block.  If you do each block as you press, you won't have a big job once your blocks are all sewn together.  I'll have a second go at this process once I sew the sashing between the blocks.
threads from one block
and threads from four blocks.  That's a lot of thread that can get stitched onto your top when it gets quilted.

Before I packed up all 81 blocks, I scratched out the measurements for the sashing fabric, corner posts, backing and binding.  Fabric for sashing will be purchased from my LQS when they open up.  Yes, I could order online, but that online store doesn't have a meeting room for my stitch group to meet, or a room to rent for my retreat group.  Shop local and keep your quilt shop LOCAL.  The backing needs 9.75 yards and I have a bolt of solid cornflower blue that has 10 yards on it. 
My second TIP  People talk about changing your needle after so many hours of sewing.  How anyone can keep track of the time they actually are sewing is beyond me.  Projects are not sewn start to finish in my studio so that doesn't work as well.  My needle gets changed every 10 or so bobbins.  At the same time, I clean my machine and wind a new row, so I'm always ready to continue when my bobbin runs out.

My nice neat row of Auril 2310 thread that I use for almost every project I made.

Stay home, stay safe and let's all be part of the solution.
Keep stitching
Sharon

Sunday, January 19, 2020

Swapping Stars

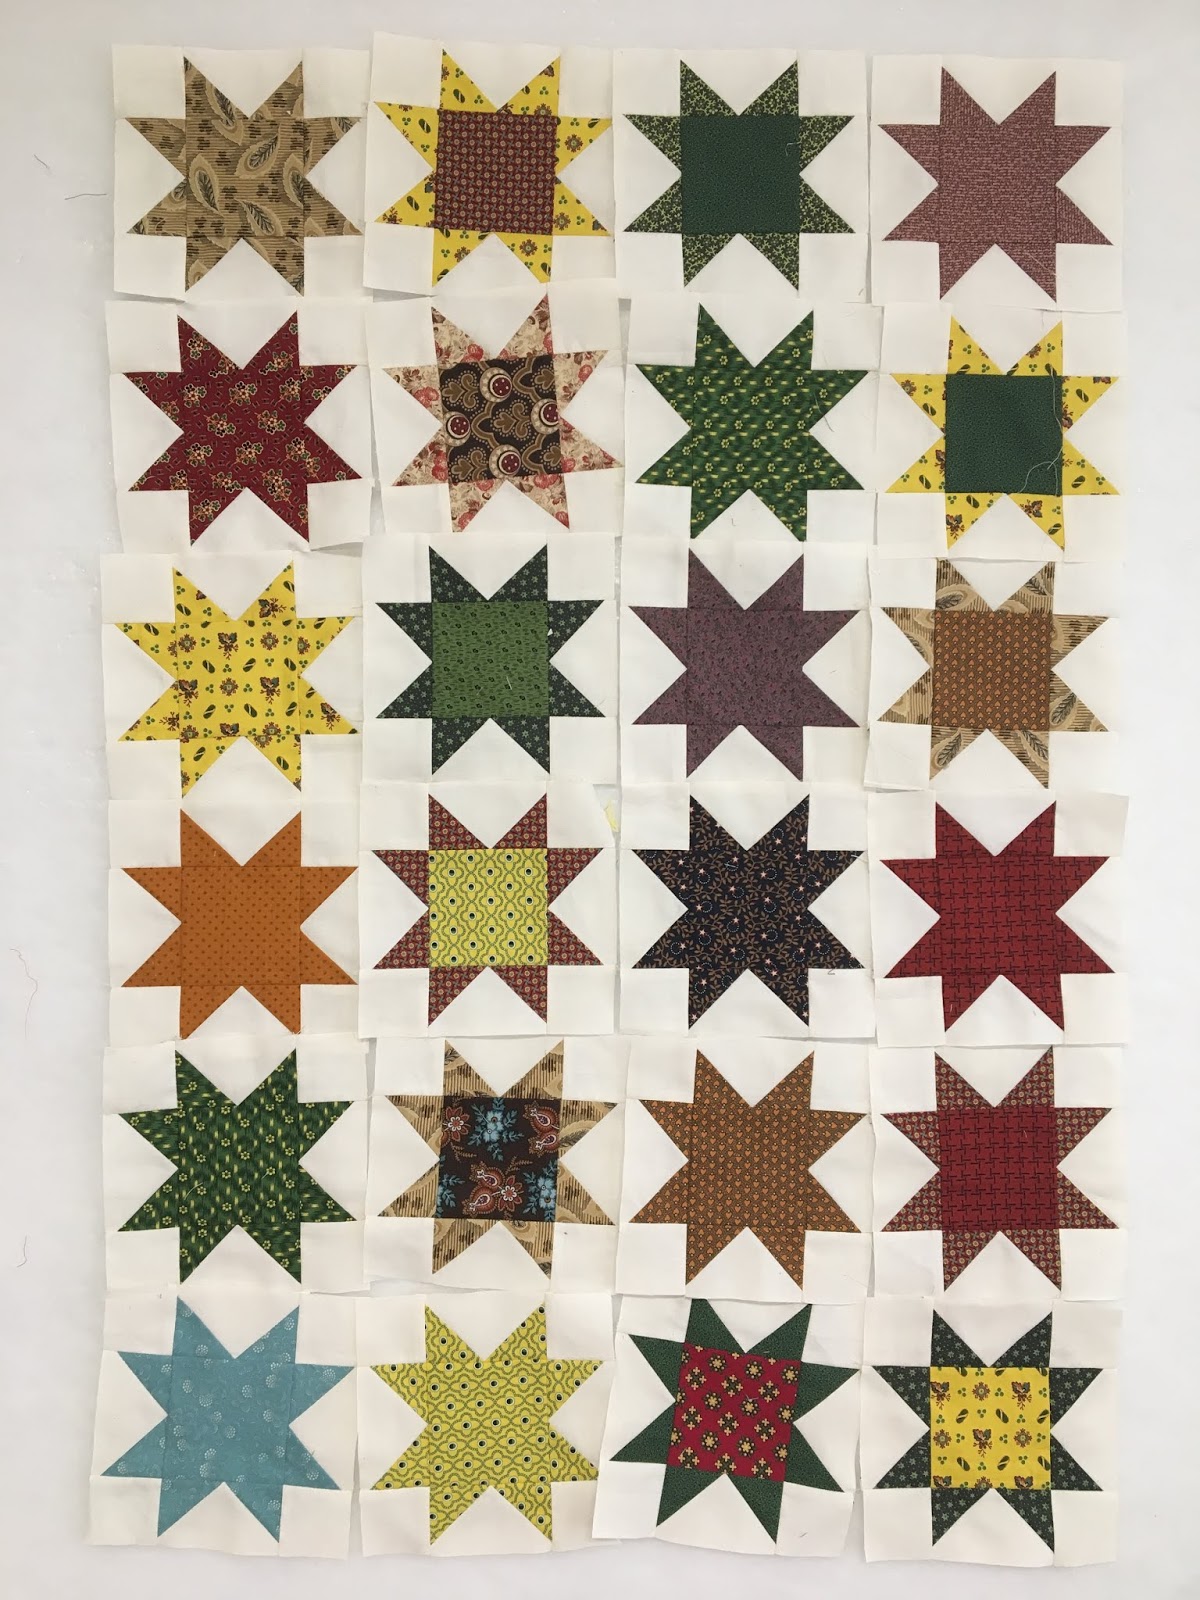
Another great swap in in the works.  Barb, from Fun with Barb hosts swaps every so often and I always try to join in.  This time was no exception, even though I knew I would be under some pressure to hit the deadline.  I signed up for making 40 blocks using 1800's reproductions prints.  Here is a sampling of my stars. 

This piece has been in my stash since 2004.  I bought yards of this when I came to the US.  I didn't know anything about 1800s reproduction fabrics, but I was drawn to them immediately. I used this for curtains in my first place here.

Barb sends out very clear instructions and parameters for her swap and that is why I love doing them.  I trust the workmanship of the participants and know that I will be getting back good blocks.
In the process of making my stars, I dug through a bag of these.  Over 100 - 6 1/2" churn dash blocks from a previous swap. 
They have been patiently waiting to become a quilt top.  I've started adding sashing on one side of each block and I have the fabric for the corner posts.

thank goodness I've started adding notes to my boxes, and bags of projects.  That is a game changer when you get back into something from over a year ago.  Counts are there, color notes, cutting measurements, etc
I only had to make 29 more blocks, per my notes.  Since I had out scraps of muslin and a variety of reproduction prints were stacked up on the cutting table, I got busy moving this project forward a little bit.
Now that I have all the blocks made, a pile of muslin scraps folded up in the bag, a few sketches of ideas, this will be a perfect project to take to retreat at the end of the month.  Lets hope I don't take this long to put the star swap blocks into a top.
Keep stitching,
Sharon


Thursday, January 16, 2020

Moderation

Have you got a copy of Quilted yet?  If not, you can find it here, along with many other great publications from Uppercase Publishing Inc, based in Calgary, AB Canada.  This is my first time having this book in my hands, and it's a hefty one.  382 pages that feature over 50 designers/makers

The post it note was from Nifty Quilts. She generously sent me a copy and gave me the short cut to her quilt.  Why, because I was fortunate enough to have quilted it for her.  See some more of her work HERE and HERE


....and she made sure I got my name added to the article. So fun to see my name attached to her work.  I've been in workshops and have stitched with Nifty and she is so inspirational in the way she creates.  I find myself making quicker decisions and I don't "over think" every fabric choice.  I can get hung up in the decision process and that truly impedes moving forward when making.

Here are a few pictures of Moderation.  Many of these blocks were left overs from other projects.  She has an amazing knack of adding in florals, stripes and plaids that seem to tie together her "orphan" blocks.
The quilting was done block by block and I did my best to keep to 3 or 4 motifs.  A lot of straight line quilting was used.


The center plate was stitched using my Circle templates and I love the motion it created.


Take a minute to click on the photos and study her fabrics, they truly are eclectic and hopefully will inspire you to take a few more chances with your next fabric pull.  Add in a stripe or a plaid, (or both), try something outside your comfort zone.  You just might be surprised with the outcome.


Moderation letters have come from Tonya's book.  The E version is available here .
It also might be available via other places and it's a book that I have used many times. 


Uppercase has showcased so many makers/designers that are "new to me"  They have shared so much of their process and a peek into their world of designing.  You can read more about Uppercase here on their website/blog.


Sorry for the sideways picture.  I wanted to show the inside cover, work of Tara Faugnan.  Several of her pieces are shown via the dust jacket, which is interchangeable.  I LOVE that idea, even though I'll be keeping Tara's quilt as my preferred book cover.

Cover option 1-2
Option 3 - 4  The one on the right is Tara's work.  She is also the designer featured in Sewtopia's Color Collective. 

Ten pages have been dedicated to Maday Delgado.  Do you know her work?  I didn't and am so inspired by her work.  Find her HERE and on Instagram @sustainabletextiledesign  This maker is SO amazing. Go check her IG feed, right after you finish reading this post!

A huge thank  you to Janine Vangool from Uppercase for leading this amazing publication.   She has brought many makers to my attention via this book.  It's definitely one worth getting into your collection.  

Snow days are  Sew days.  I hope everyone is staying safe and warm as Mother Nature brings winter to many of us this week. 
Keep stitching,
Sharon

Sunday, January 5, 2020

Cheddar Star Surprise

I got an unexpected surprise right before Christmas. As I was waiting on a friend to pick out a few car magazines for her guy's stocking, I picked up the NOV issue of Quilters World and what to my wondering eyes did appear? Why, my Cheddar Stars quilt!  I had sent this one to the magazine in October of 2017, so it was a big surprise to see it in print.  You might still see this issue on some news stands, but the website has moved on to Spring 2020.

This is the first photo of the quilt, but please turn the page to see the true colors.  I used Saffron, a lovely shade of cheddar,  and French Vanilla, my "go to" cream,  both from RJR Fabrics.  I do love the hand of these solids, they drape so nicely and are lovely to work with.


Here's the quilt laying on the floor, sorry for the skewed photo!  **but this color is more like Saffron, the above picture is quite "orange" :-(


Ohio Star blocks use 1/4 square triangle for the star points, and the sample was made with Triangles on a Roll.  When I need 324 of one block, I look for a method that allows for "production" sewing.  By making them on the paper, I was able to make the star point blocks in batches.  There are many methods to achieve the same result so choose the one you like.


Here is my smaller version pieced in red.  This little one has been cross hatched and has stars in the corners with plain cream borders.   I had used up all my Saffron, so when I wanted to make step outs and photograph along the way, I used red and now I have a mini!


The quilting was done with rulers and circle templates for the blocks and sashing, and the border has been free hand quilted with feathers. 


Keeping all the blocks lined up in both directions takes a bit of skill, but using a few tricks, I managed to get the rows pretty straight in all directions.  There are no corner stones in the side to side sashing.
Close up of block and quilting,

Details of this quilt:

Fabric: RJR Cotton Supreme Solids in Saffron and French Vanilla
Batting: Hobbs Tuscany Wool
Piecing: Aurifil Color 3210 in 50 wt
Quilting: So Fine by Superior Threads
81 - 6"  Blocks
Finished size: 90" x 90"
Published Nov 2019
Quilters World

*original plan was all cream sashing, but when I rolled out the second bolt of fabric, the dye lot was slightly off.  I just had enough of the Saffron to make it work, and I am thrilled with the results.

So what are you working on this month?  Me, it's getting a few blog posts up, catching up on customer quilts that were not Christmas quilts, and assessing all the UFO bags, bins, boxes, and baskets in my studio.  I have 3 days of retreat sewing coming up at the end of the month; I plan on have a box and a bag empty and two completed tops.  Fingers crossed my machine doesn't start smoking like the last retreat I went to!

Keep stitching,
Sharon

Sunday, October 6, 2019

Bling Bling Applique


This four block applique pattern, available here, has roamed around my mind since the late 2000's. I think I got the first look at it about 2009 and had a small photo of it on my desk top. I knew one day I would make it, and Wendy Whellem from Legend and Lace generously sent me that photo before it became a BOM in Quilters Companion in Australia.  What drew me to this piece was her colors; the cheddar border, the black and white striped sashing fabrics. It just sung to me.


I started these blocks Oct 30, 2018. Back basting is my preferred method for needle turn applique and I wanted a travel project for our annual trip to Hawaii. This was it! The blocks were finally finished last week. Having a 20 1/2" square ruler made trimming these blocks a snap. It's a ruler I don't use often, but when I need it, it proves it was worth every penny I paid for it.


Instead of sashing, I thought a row of 1/2 sq triangles might make a nice bright border treatment.  After putting a few up beside the big blocks I quickly switched to two rows and started making my 1/2 sq triangles.  It I could do proper math, I would have made 276 but instead I was pulling fabrics two more times to get the right number!


I started trimming my blocks to 2 1/2" squares and piling them by color.  This way I could spread out the prints/colors to get a nice balance.


And I continued trimming.  This may seem tedious to some, but when I put together my Broken Dishes blocks, and all the seams lined up, I was reminded how taking time in all aspects of the piecing process results in GOOD results.


Many may see borders of pinwheels but if you start in the corner, you will see it's Broken Dishes. 

Spreading out the yellows and blues was important, as these were the two colors that were used the least.  By using prints from the appliques, it keeps the eye moving around.


Making sure my center lines up and I have enough pieces to create each row of the sashing.


Testing the full border and I was so glad I went with a double row of 1/2 sq triangles.  A single row just seemed to wimpy for these big, full appliqued flower pots.  I did take liberties with the applique, birds were added to one block, circles around flowers made their way into my piece, and some shapes were eliminated. ( Thanks Gwen!)  That's the beauty of quilting, you can take any pattern and make it your own.


It took 6 uninterrupted hours to piece together all the blocks for the borders.  I had a plan, stuck to it and am so thrilled with the final results.  I've got a ream of fabric ready to press, cut and sew into a backing and once my next customer quilt is off the longarm, this one will get basted for hand quilting. 
Details:
Almost 1 year to complete the applique
Background is French Vanilla by RJR Fabrics (my favorite)
Prints are 1800's reproductions from my stash.
Appliqued blocks are 20" finished
1/2 sq triangles unfinished 2 1/2"  (276 of them)
Broken Dishes blocks 4 1/2" unfinished.
Back basted needle turn for applique. 
Finished piece 52" x 52"
Hand quilting will outline appliques and cross hatch will extend into border
Binding will be background fabric

What piece is on your bucket list?  What's stopping you from starting?
Keep stitching,
Sharon